
The subscribe to record action is probably one of the most un-used actions in workflows. Mostly because we find it is the least understood. However, once you have mastered how it can be used, it can be an incredibly useful tool, especially for approval workflows. The Subscribe to Record action is one of the few actions for workflows that can update joined records of different types. In this article we will build a quick approval workflow that will capture a rejection reason but properly account for users who may opt to skip this step by closing the window or using the browser navigation to go back to previous windows. The most common application of capturing rejection reasons is to use the Go To Record action to redirect the user to a custom record type, with a mandatory field for "Rejection Reason", as described here in our post on Capturing Rejection Reasons. This can be sufficient, but can also open up the door to potential problems if the user does not have the patience to wait for a new window to load and then save their response. This is where you can use the Subscribe to Record action to "monitor" the created custom record for changes, and when the proper change occurs you can then move the transaction through the proper steps of the approval workflow.

The Subscribe to Record action is very powerful, but can be tricky to setup correctly and this process does take a lot more configuration than most workflow actions. One thing to note, is that perNetSuite's documentation, this action is meant to be used in conjunction with the Create Record Action. This means you must first create a record, store a reference to that record in a workflow field, THEN subscribe to it, using subsequent steps in your workflow state. We have successfully used the Subscribe to Record action in conjunction with the Go To Record action in the past, but it has proven to give inconsistent results.
To begin this process first make a custom record in your environment called "Rejection Reason", or whatever best fits with your use case. Be sure to include a field for the user to type in their response AND a List/Record field that you can use to reference the transaction it is related to.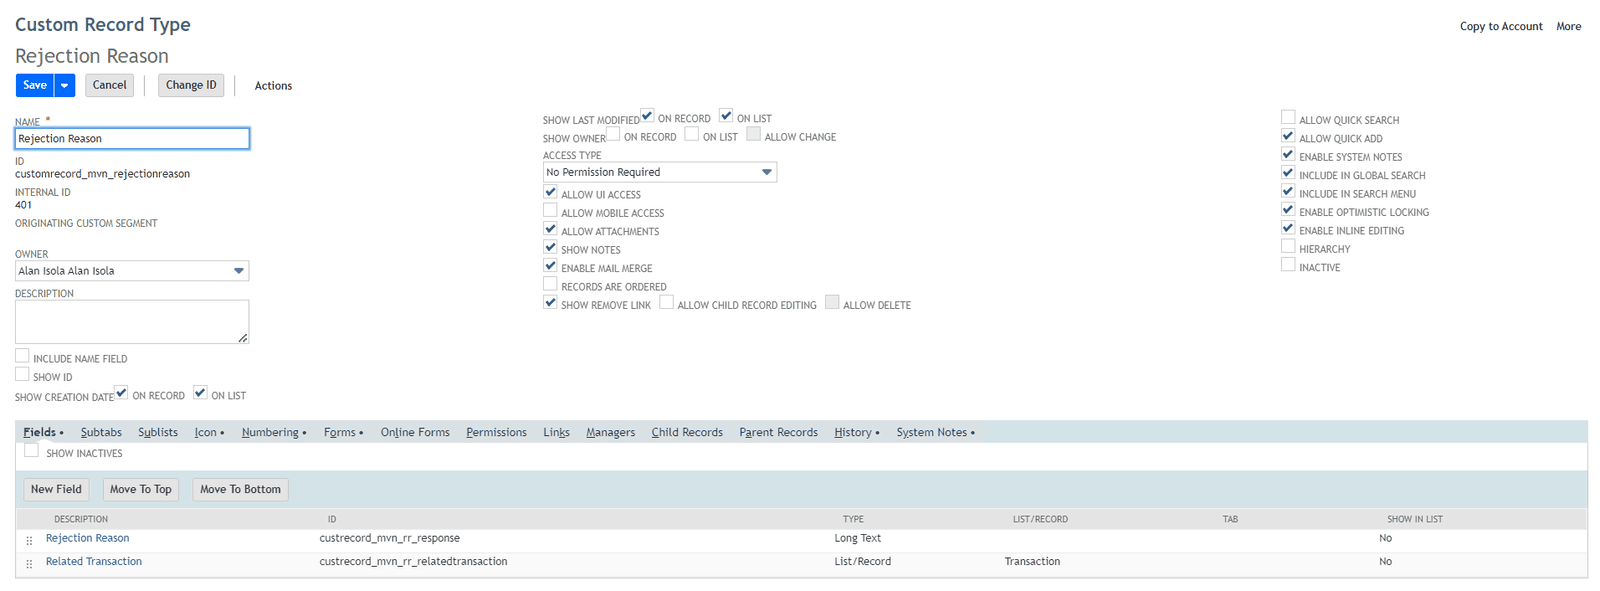
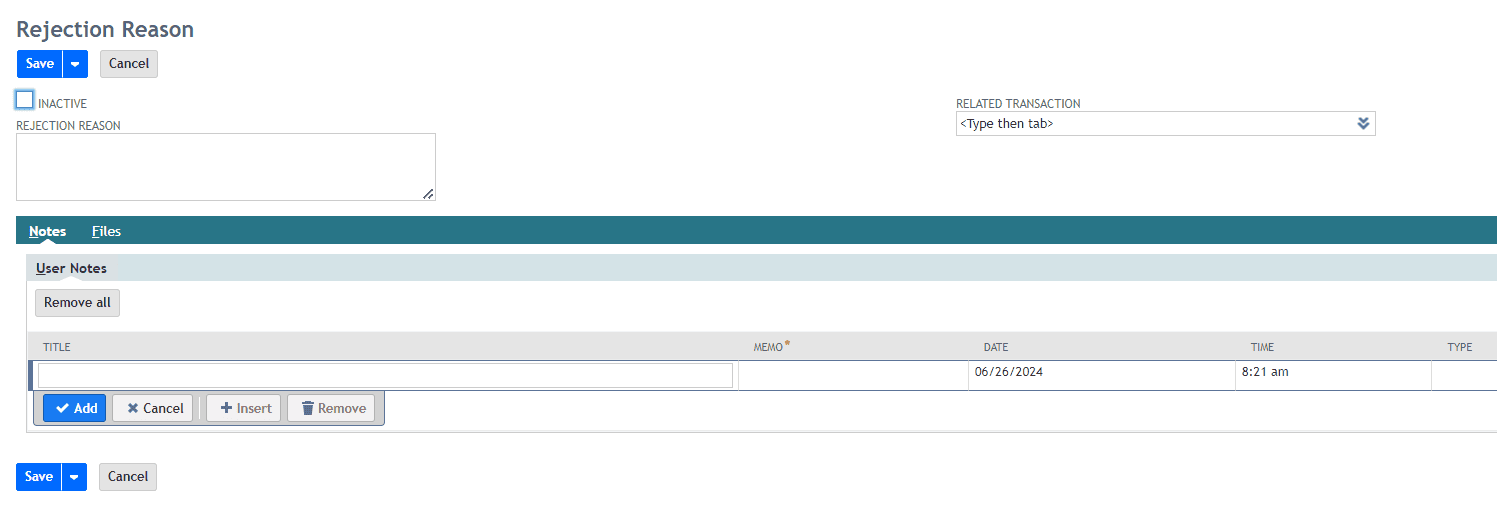
The resulting record would look like this. (You can add more fields to gather more information if necessary but you would at least need these 2 fields for this workflow to be successful)
Next you would need to update your approval workflow to add a workflow field AND a new state for capturing the rejection reason.
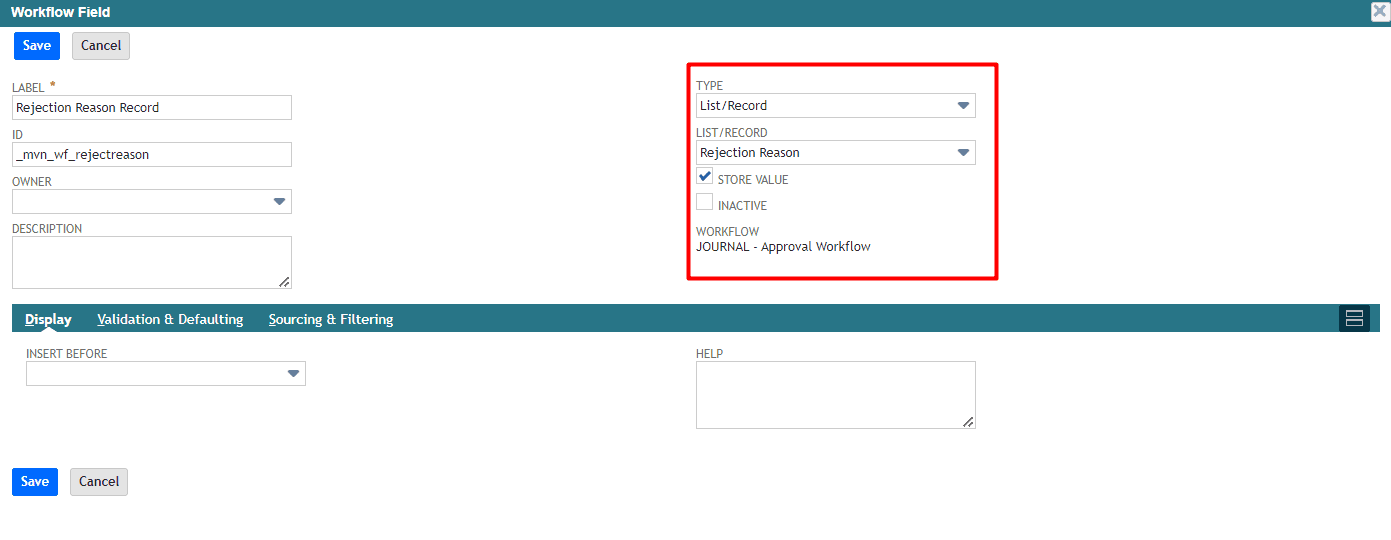
In the workflow settings first create a workflow field called "Rejection Reason Record" and be sure to set it as a List/Record type referencing your new custom record you built in the step above.
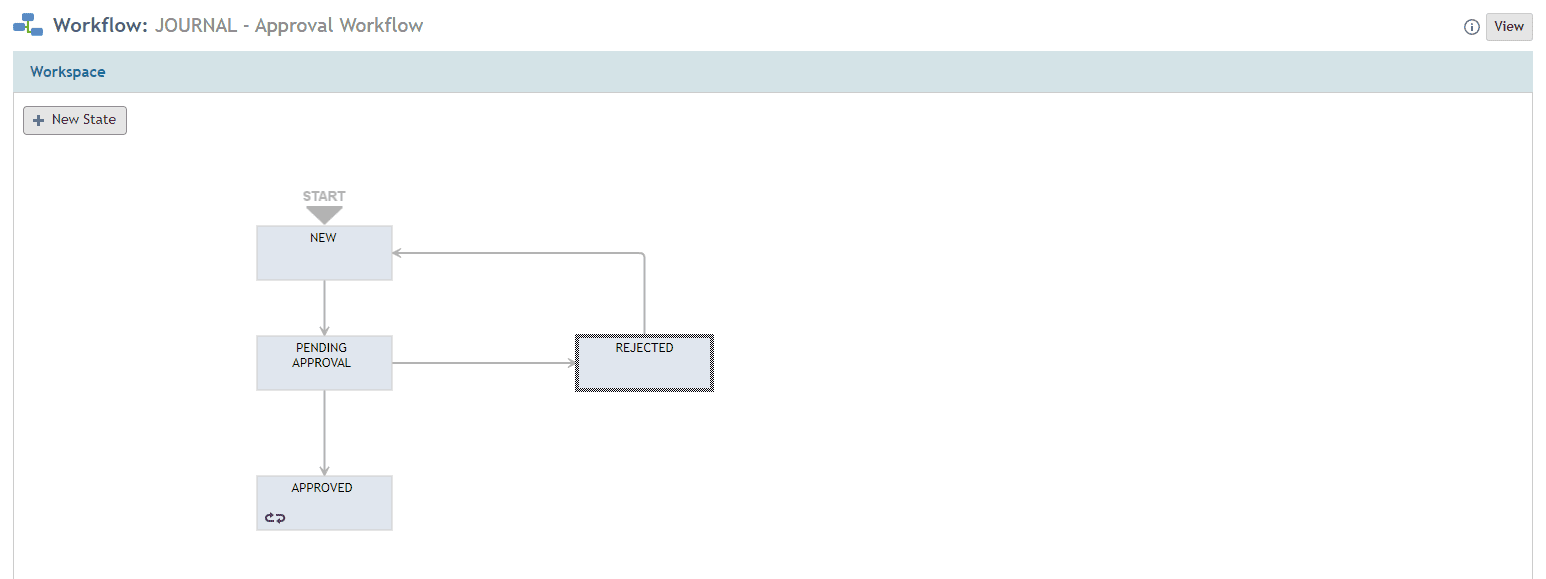
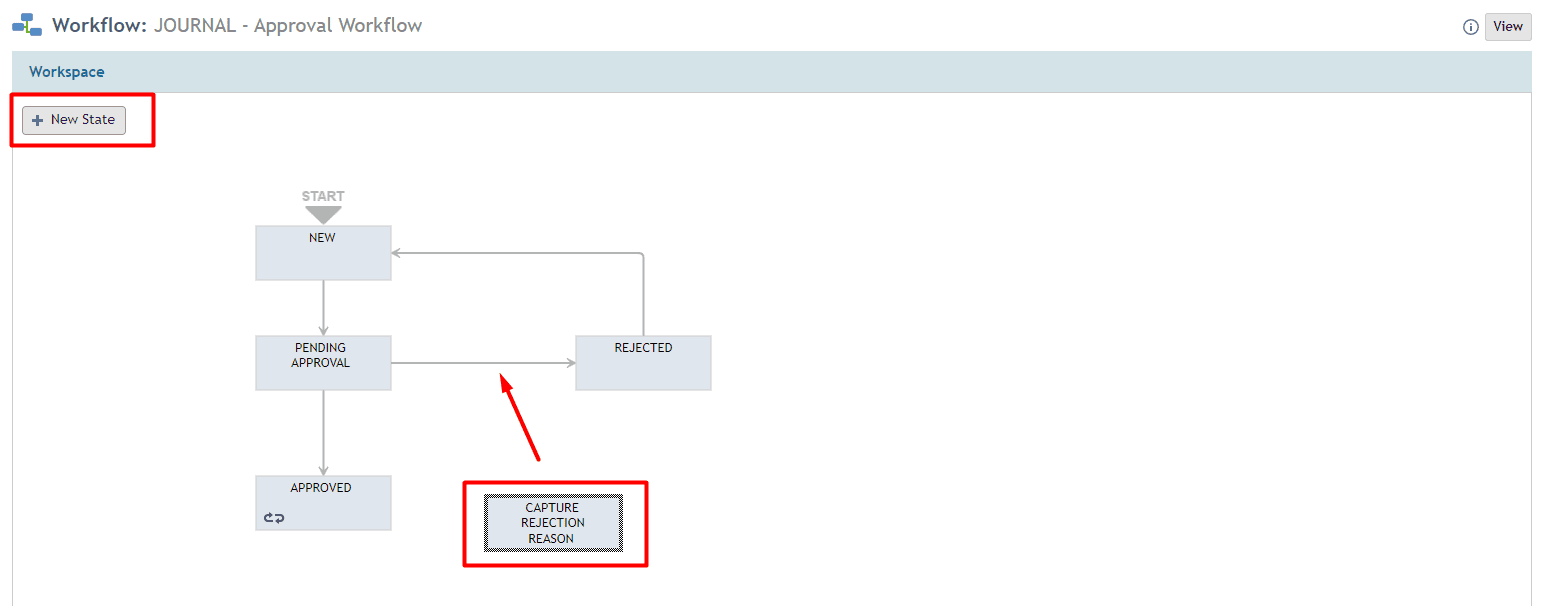
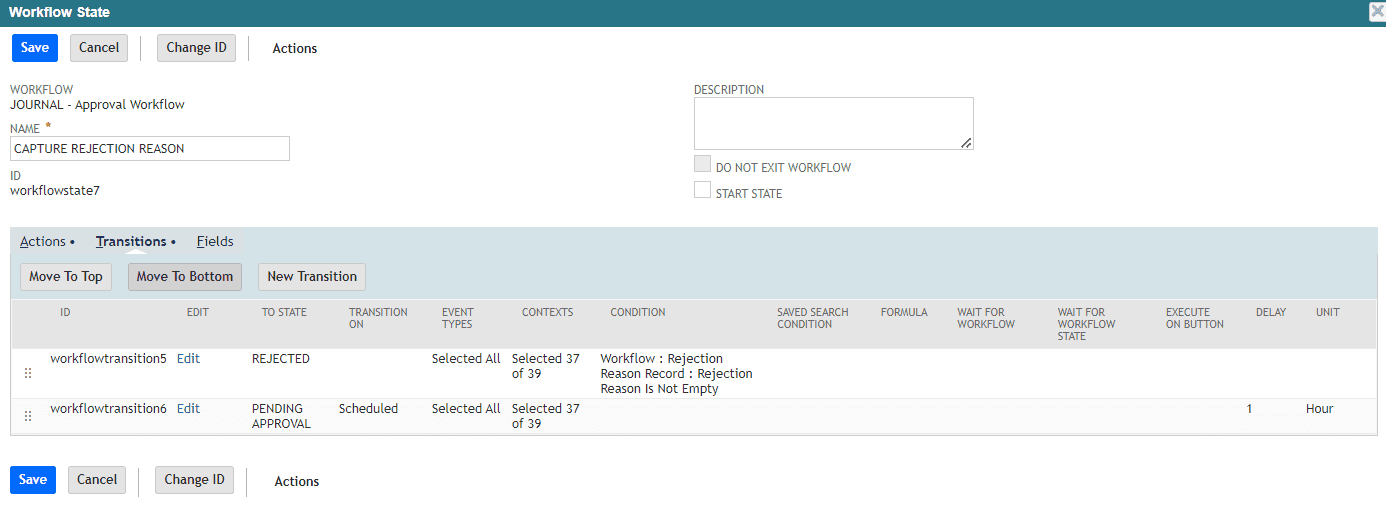
The next step is to add a new state in your workflow called "Capture Rejection Reason". It will eventually be inserted in between the Pending Approval State and the Rejected state.
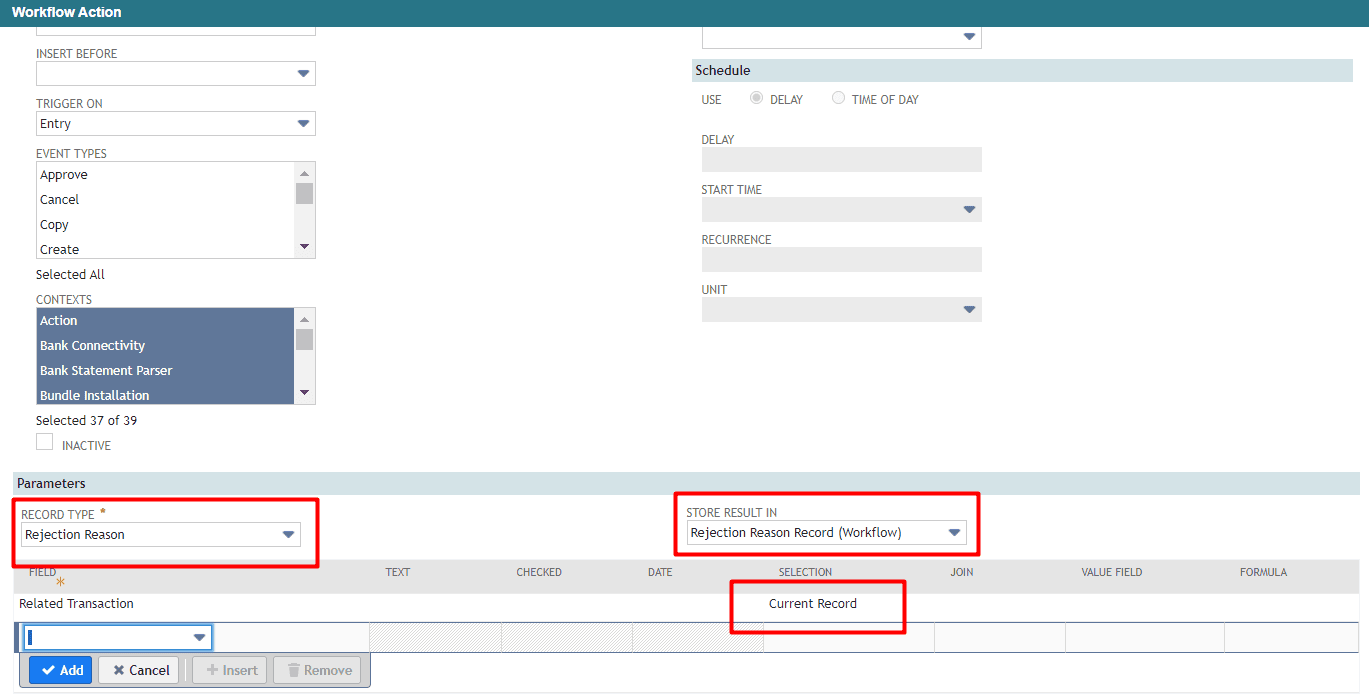
In the Capture Rejection Reason state, add the Create Record action (using the Entry trigger). Make sure you set the Store Result In field in the workflow parameters AND also set your Related Transaction field on your Rejection Reason to the Current Record. This will join the Rejection Reason record that is created back to your Journal Entry.
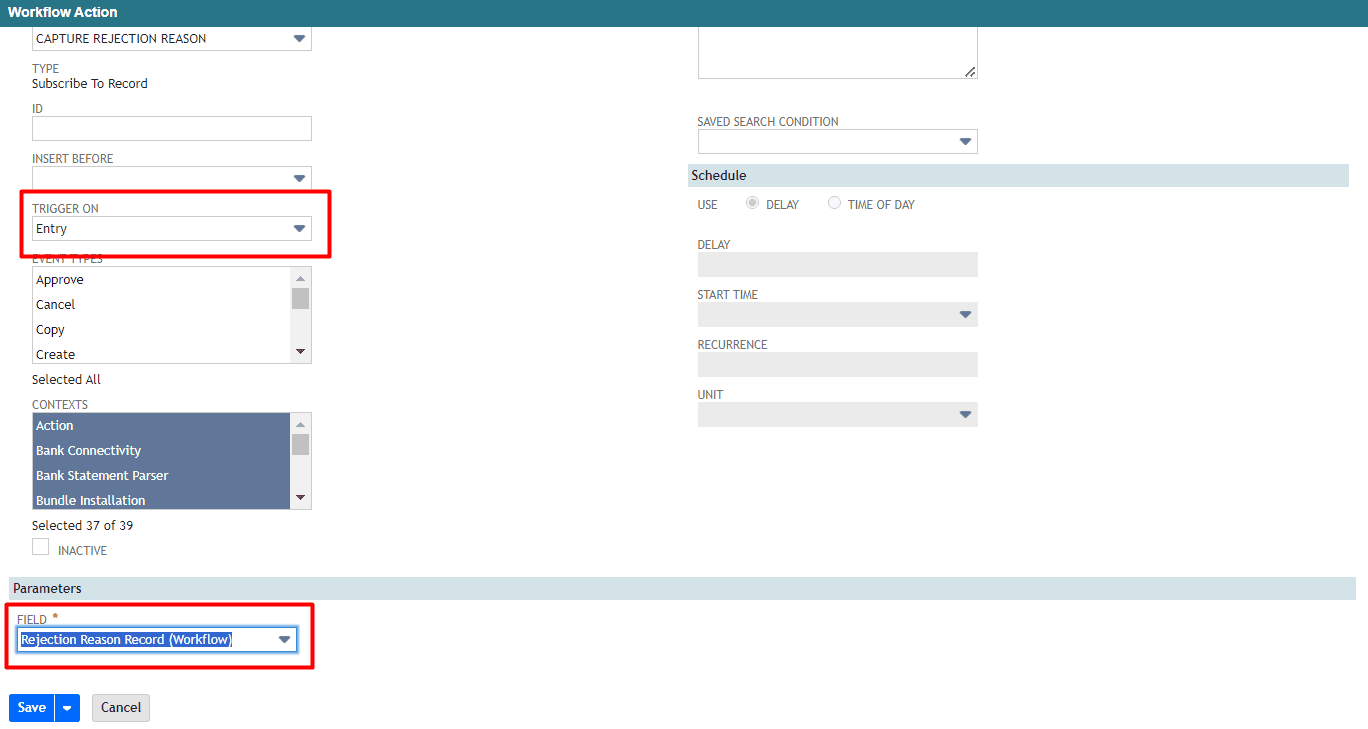
Next add the Subscribe to Record action, using the Entry trigger and you use the new workflow field you created as the reference for what record you should subscribe to. (Make sure it is the step DIRECTLY AFTER your Create Record action).
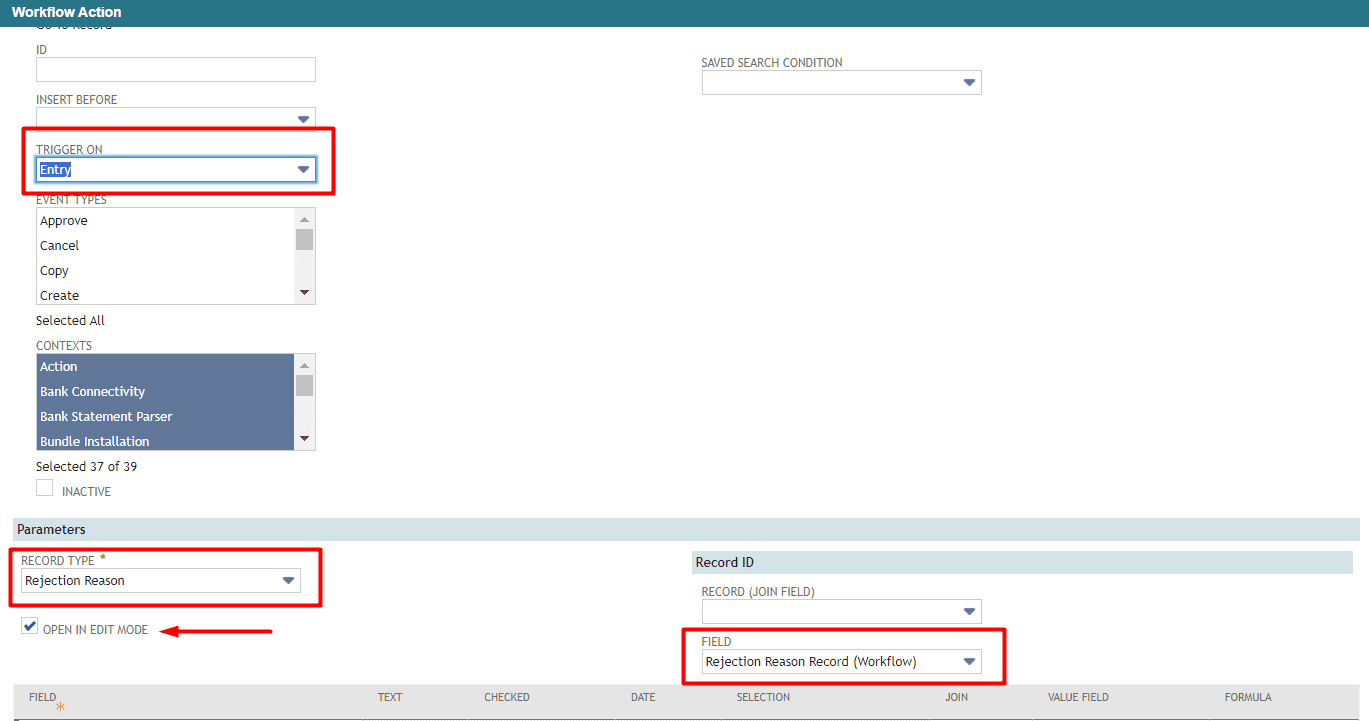
Next, add a Go to Record action that would redirect the user to the newly created Rejection Reason record.
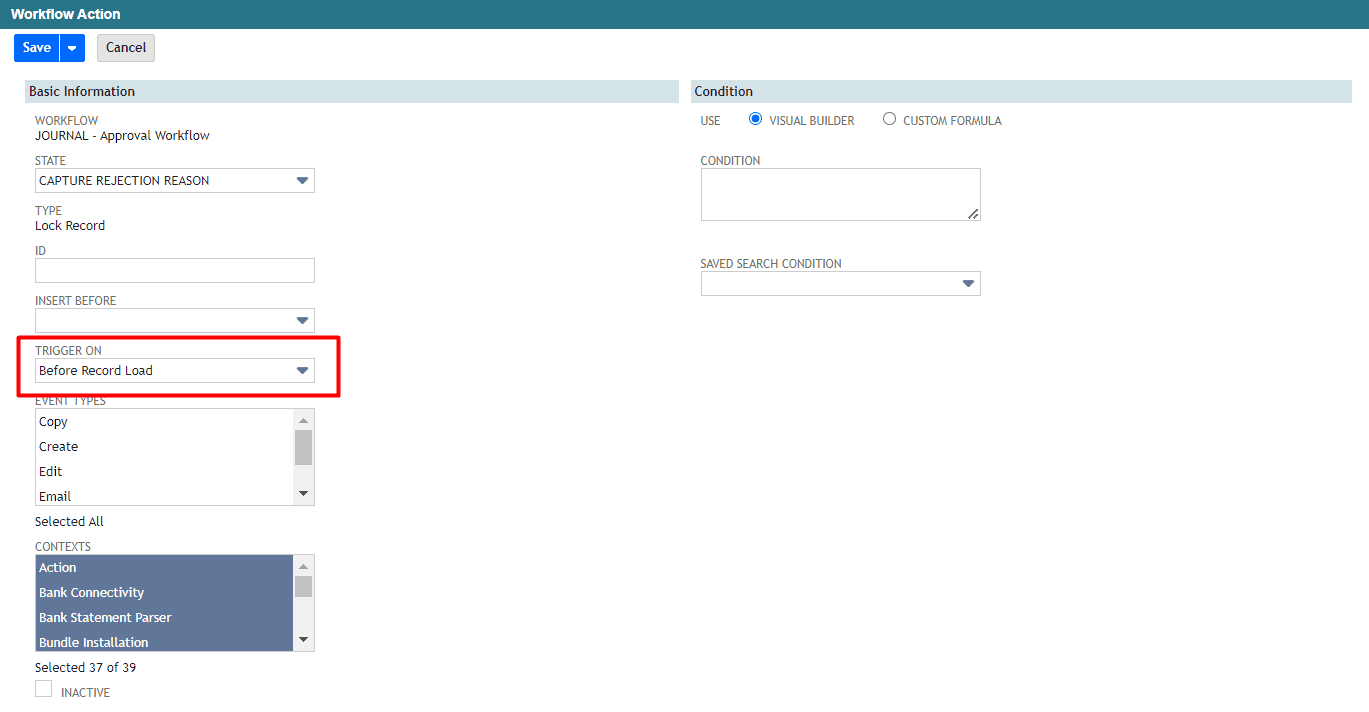
Next add a Lock Record action so that the transaction is Locked to any changes while the user is recording their Rejection Reason.
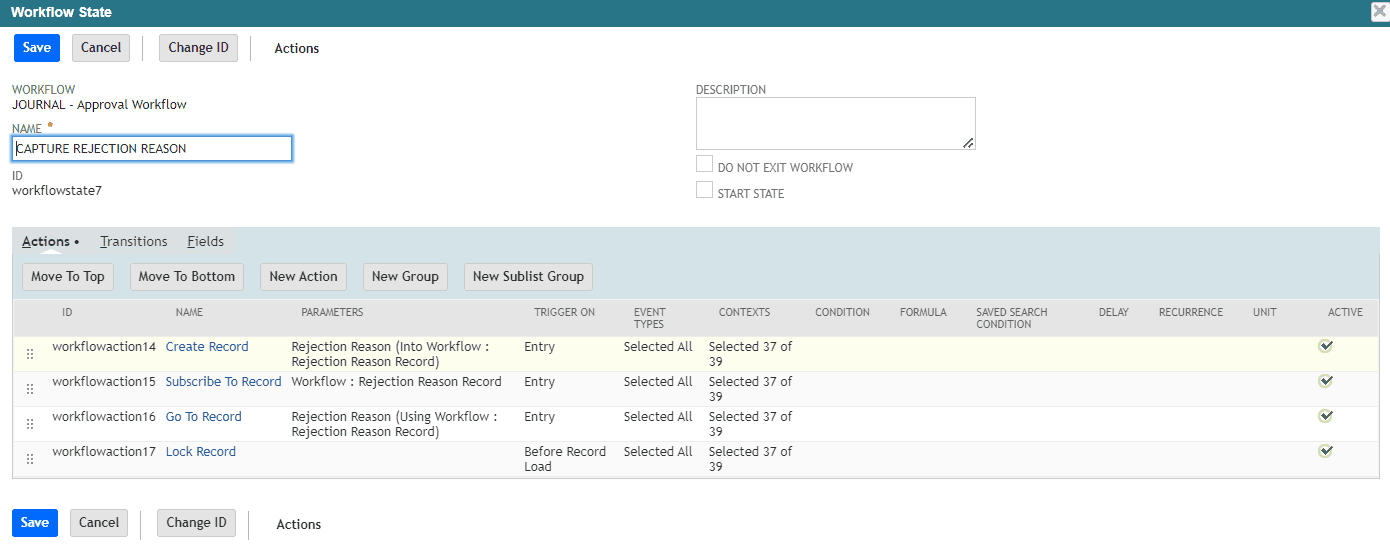
The resulting workflow state should look like this
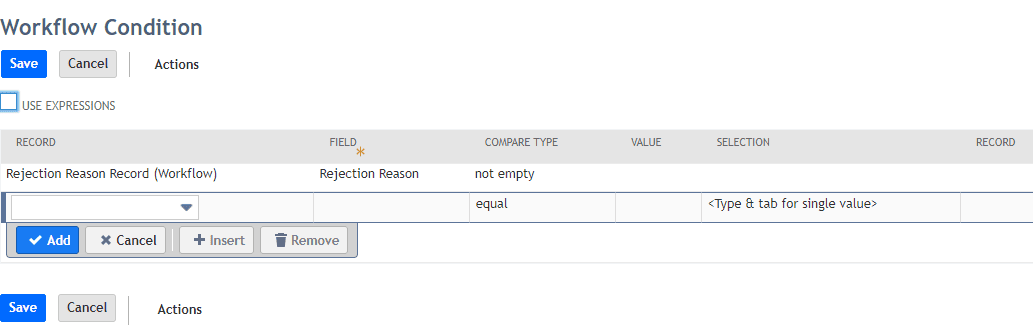
The next step is to setup your transitions to the rejected state when the Rejection Reason is entered. To do so, add a transition and set the condition to when the Rejection Reason is NOT EMPTY
Then set the state to REJECTED and leave the Transition On trigger empty.

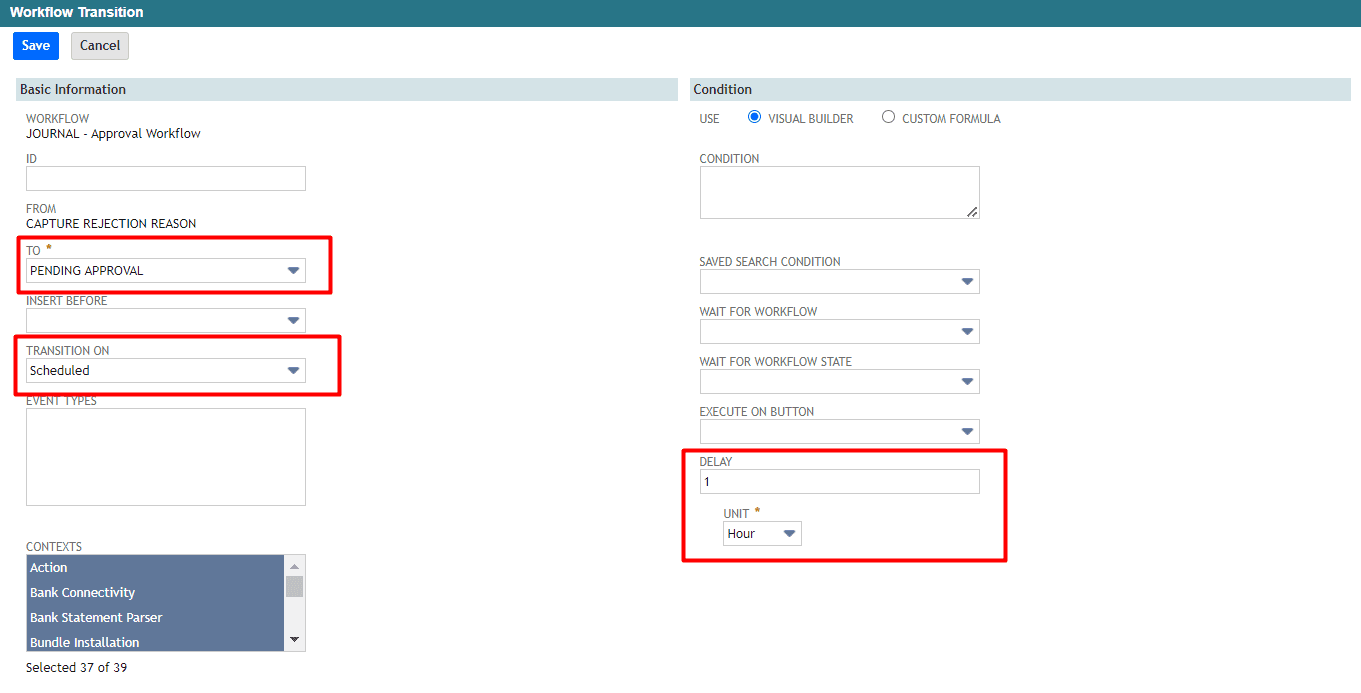
Setup a second transition that is Scheduled, to send the record back to the Pending Approval state. This means that after 1 hour the record will go pack to Pending Approval so the user can try again to reject it. (NOTE - A scheduled transition will only work if there is a delay value set and the smallest delay value available is 1 hour)
The resulting transitions in the workflow state should look like this
To support the process if someone were to reject the same transaction multiple times it would be a good idea to clear your Rejection Reason Record (Workflow) field before it gets to the Pending Approval state again. Depending on how the rest of your workflow is configured you may have a different application of this, but here we are going to add a Set Field Value action upon Exit of the REJECTED state, so when the record exits the REJECTED state to be resubmitted for approval the Workflow field will be set to NULL.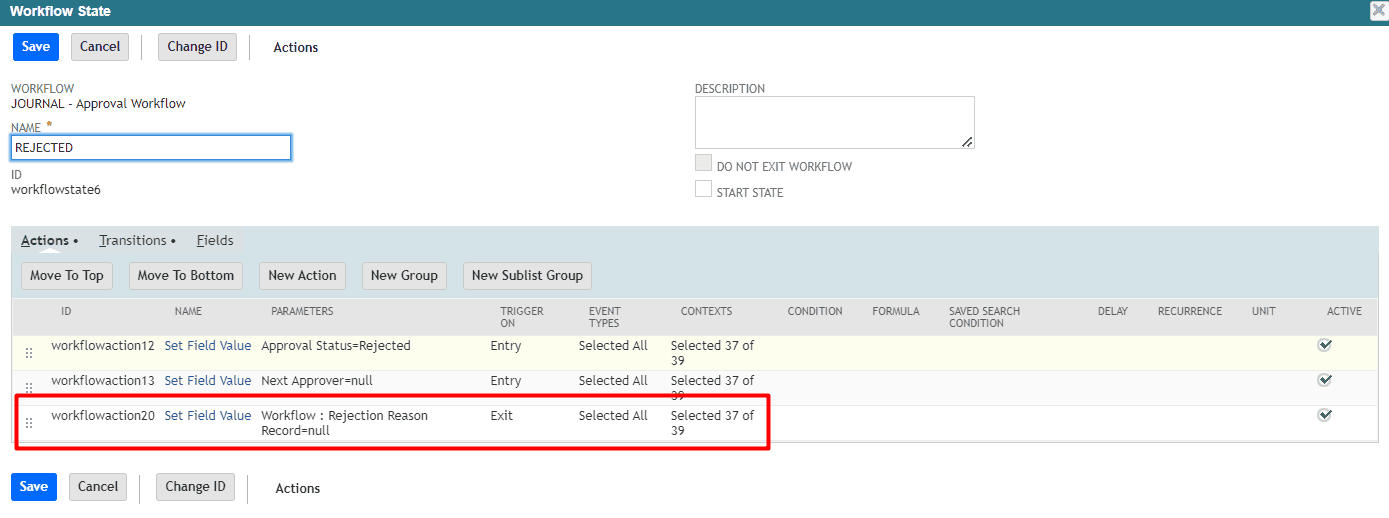
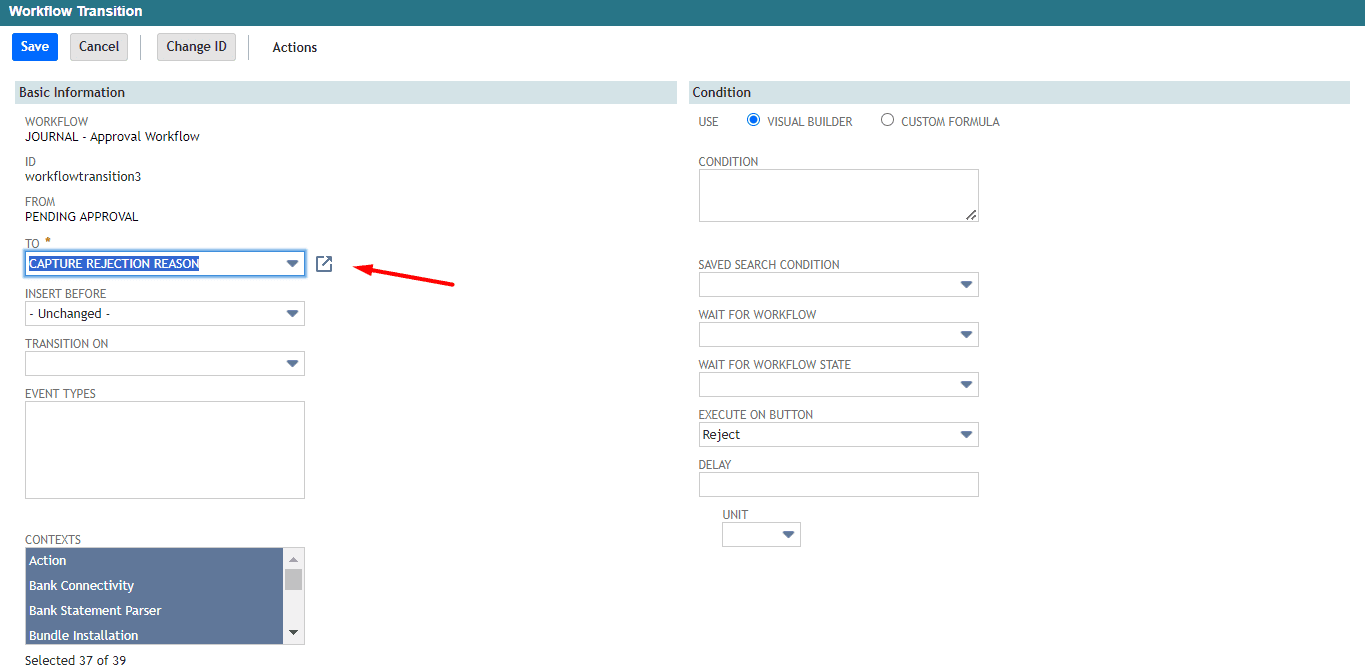
The last step to take is to update the transition from your Pending Approval state so the record transitions to you new Capture Rejection Reason state instead of going right to REJECTED.
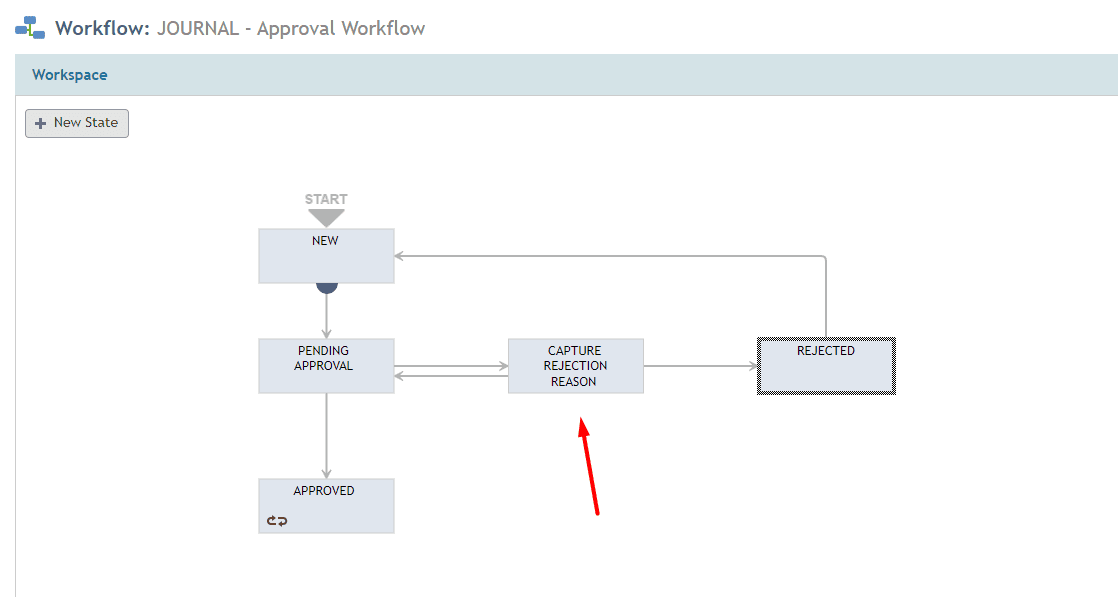
The resulting workflow should look like this.
To further help the user experience you can create a separate Workflow for the Rejection Reason record that would enhance how the user interacts with that record. Here we have setup a single state workflow that would set the Rejection Reason field to Mandatory AND would redirect the user back to the original transaction when saved.
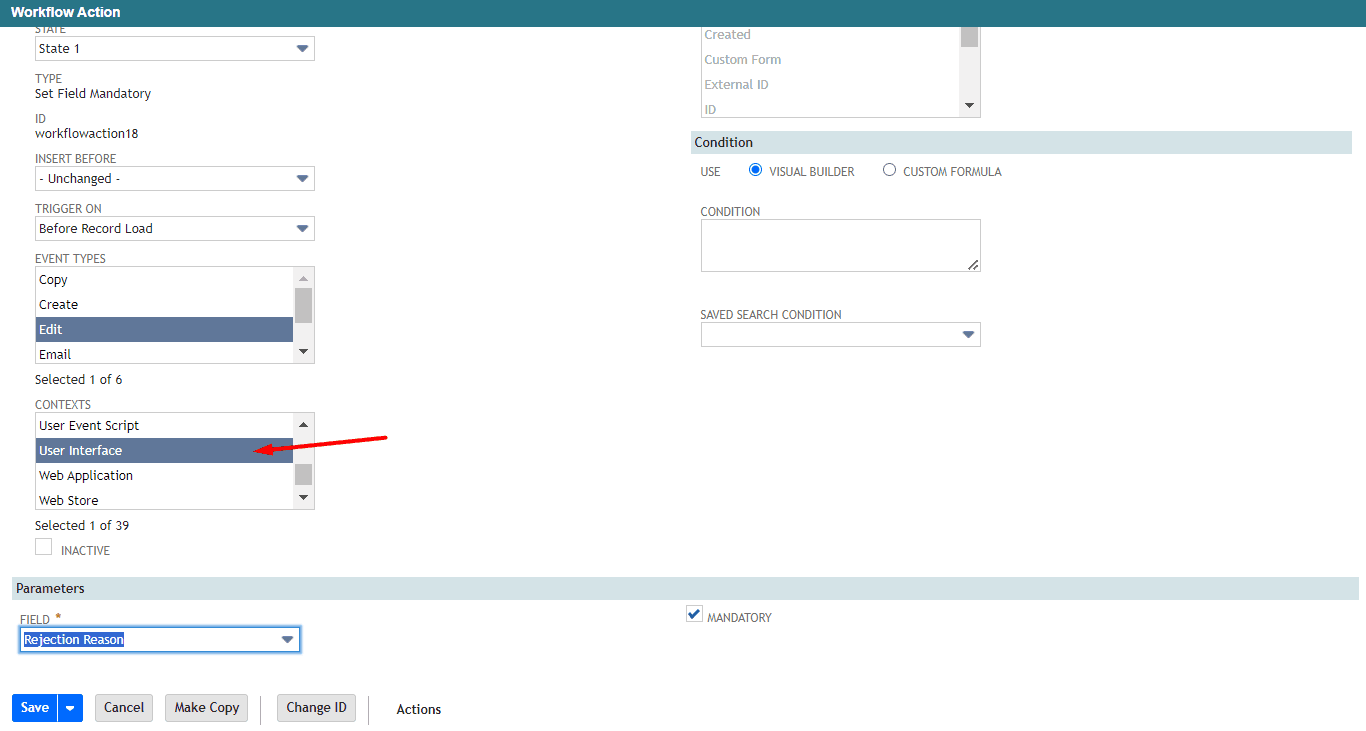
Here is the Set Field Mandatory action configuration. Make sure that you update the Context of this action so it is only triggered in User Interface, as we don't want this to conflict with the Create Record action of your other workflow
Then here is the Go to Record action that will redirect the user back to the Transaction when it is saved.

With these two workflows you can see how the user experience is fairly seamless when it comes to requiring a rejection reason for records and transactions. One nice thing about this setup is you can utilize this Rejection Reason record across any approval workflow, transaction type and record type. You would simply need to up date your Rejection Reason workflow to redirect to the correct record by creating multiple Go To Record actions; one for each record type using these rejection reasons.
There are many more use cases for this Subscribe to Record action as you can use it to perform transitions, other actions and as part of criteria and conditions. While the setup and configuration is a bit advanced, the uses and solutions it can help with are quite extensive. If you would like help setting up workflows or enhancing your current workflows, please reach out to us and let us know. We also have expertise in almost every area of NetSuite from configuring new modules, to developing custom integrations or processes. Let us know if you have any questions or how you have used this subscribe to record action in your operations.