
As we continue through our Workflows for Beginners series, we will now take a look at the Go to Record action. This action is quite versatile and also VERY powerful, when it comes to directing users through a process. This action is one of the first that can help create or manage other records (besides the base record defined in your workflow configuration). There are limitations here, but overall this can be extremely helpful and provide a more advanced experience for users.
The Go to Record action essentially redirects a user to a new (or existing) record to continue their process or entry of data. This can be used to create a new instance of a record type and then "join" it to your current record, OR simply to navigate to an already joined record. For example, when entering an Estimate you select the Customer, this creates a "join" between the Customer and Transaction records as you are associating the Customer with that Estimate. Now you can use this "join" to redirect the user to the Customer record from your Estimate either automatically or by the click of a button depending on your use case.
The Go to Record action is limited to only 3 triggers;
- After Record Submit
- Entry
- Exit.
This is because using another trigger with this action could result in loss of data. For example if you were to redirect to a new record Before Submit, then the data you entered on the current record would NOT be saved and therefore would be lost. In this regard, using After Submit circumvents this problem as the current record is fully submitted (or saved) to the database, then the user is redirected to the new record. Entry or Exit triggers mimic the functionality of Before Load or After Submit (depending on the context) and therefore are also safe to use.
For this example, we will use the very popular use case of entering a rejection reason within an approval workflow. It is a very common ask among NetSuite Admins and Developers to capture reasons when users are approving or rejecting transactions, however, there is not a lot of great solutions to this problem. One of the most common solutions is to create a custom record that you would use to hold the response from the user and use the Go to Record action to redirect the user to this record within the workflow.
As an alternative to the solution provided in this article, we have developed a versatile and powerful custom action that gives you as a NetSuite Admin the ability to capture responses from your users in the form of pop-up messaging. Our "Pop-up with User Input" action is able to be deployed in any workflow and upon any record type and produces a pop up window (in real-time) to the user requesting and input. Then records what they type into a field of your choice on the current record so their responses can be saved and recalled later when viewing the record of in saved searches and reports. This custom action can be deployed and setup within minutes so you can start using this amazing feature right away. Click here to learn more information about this simple and incredibly useful tool, and take your workflows to the next level.
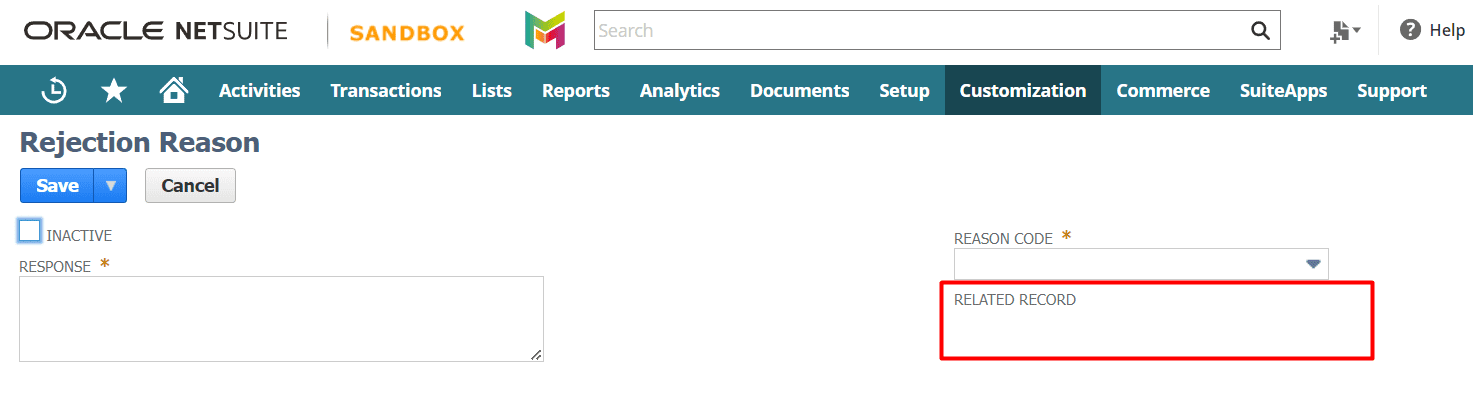
First we can start by creating a custom record called "Rejection Reason". On it we will put a Long Text field for "Response" and also a List/Record field for "Reason Code". Furthermore, we have a field to join this custom record to the Transaction it relates to so we can see the two linked together for future reference. Remember since this is a custom record you can add as many fields and features as you want to collect the necessary information needed for your business.
The next step is to add this functionality into your existing approval workflow. (Or if you need help building an approval workflow you can start with our blog on "Building your First Workflow".) In this example we will open up our Rejected state where we have set the Approval Status to "Rejected" and Locked the record so no one can change it anymore now that it is rejected.
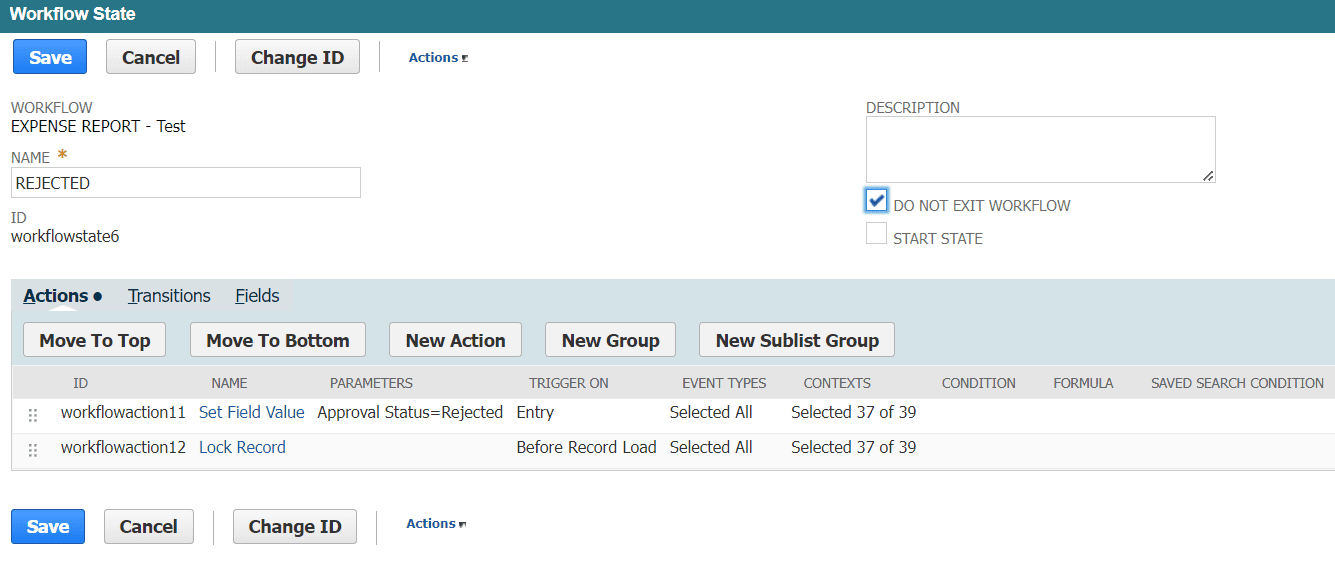
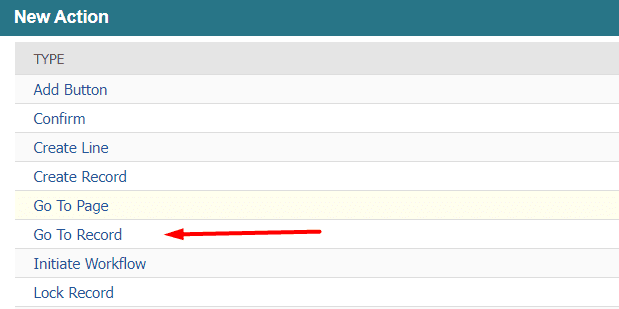
Then lets add the Go to Record action here so the Approval Status is changed automatically, but the user is redirected to our new custom record.
As mentioned before you can only use this action with a few triggers, but since the user is clicking a button which is transitioning them to the Rejected state we will use the Entry trigger. This way when they click the button it will enter the new state and send them to the Rejection Reason record, however, it will NOT happen every time someone views the record, because it only triggers when it first enters the state. (Which is right after the button click.)
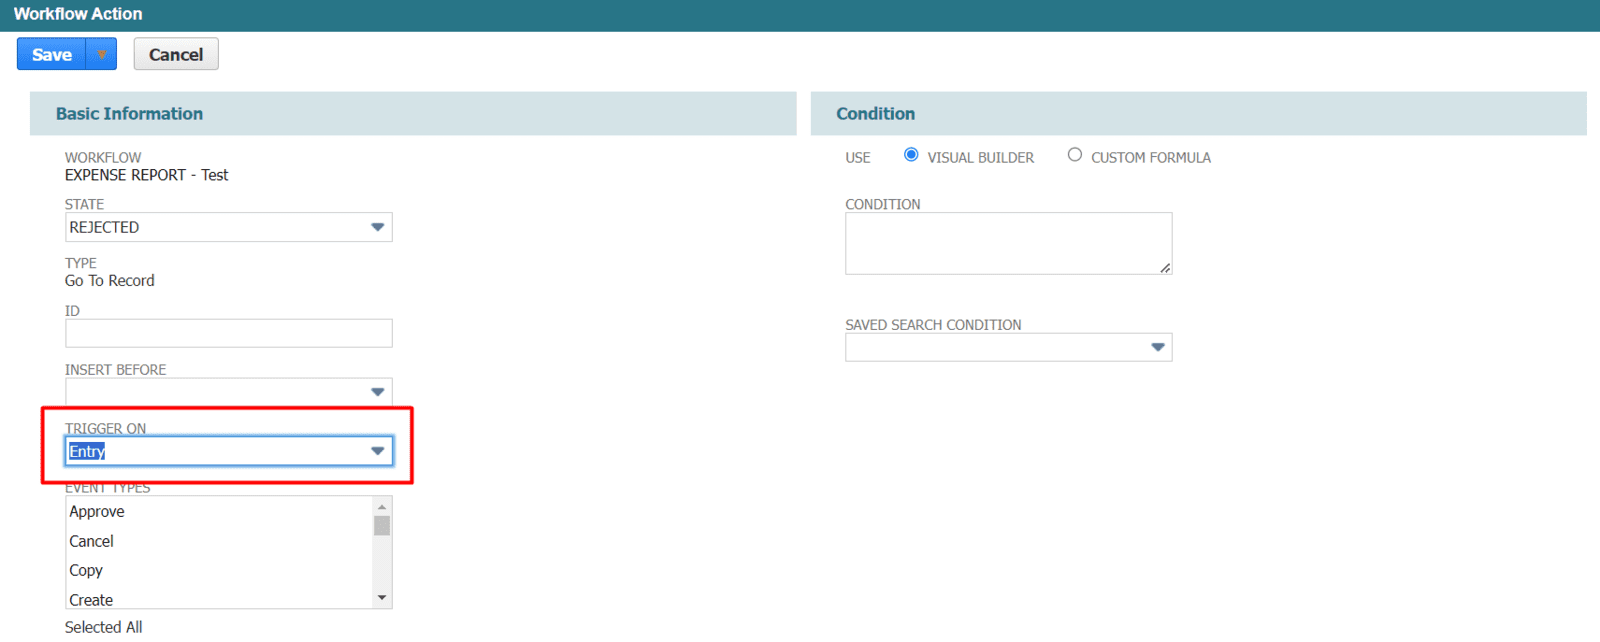
In the parameters of the action we will select our Record type. This is the Rejection Reason record we created in the first step.
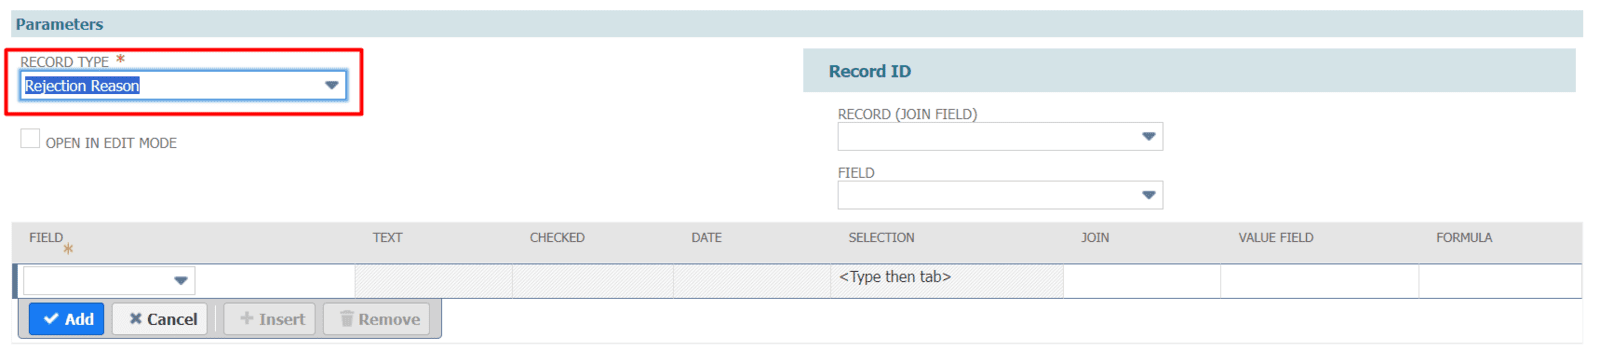
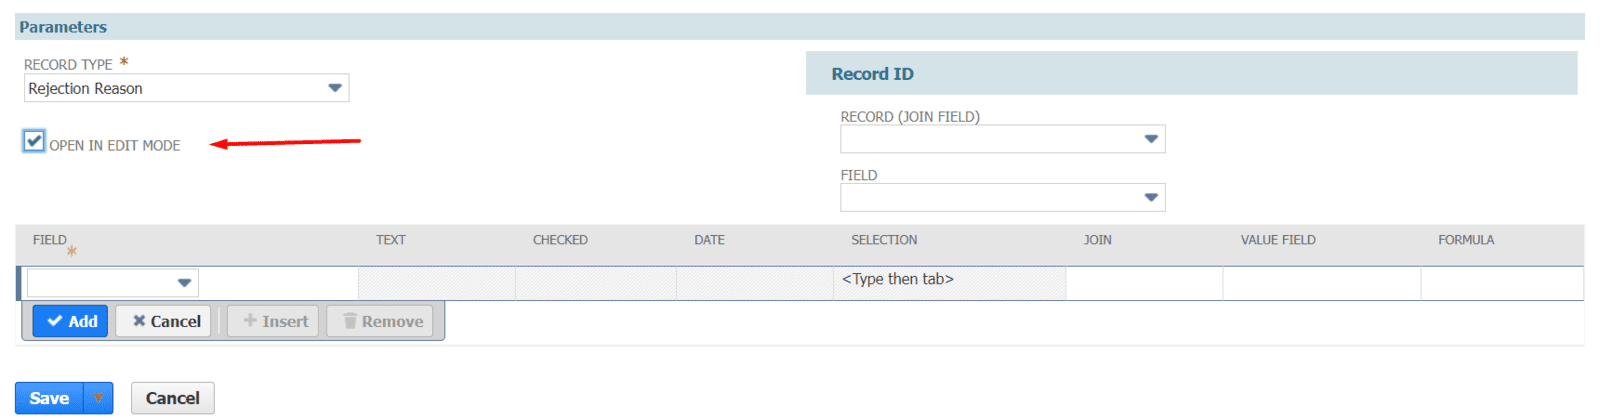
Now because we want the user to create a NEW instance of this Rejection reason we will mark the Open in Edit Mode box. This will load a brand new instance of the Rejection reason record and it will already be in Edit mode to save the user from having to click edit.
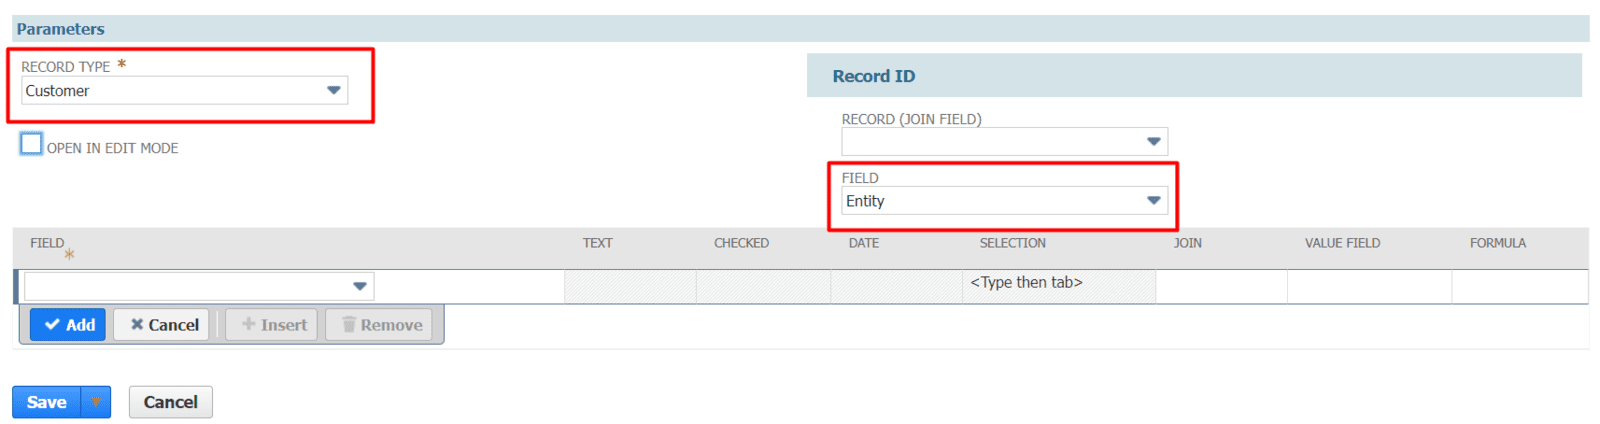
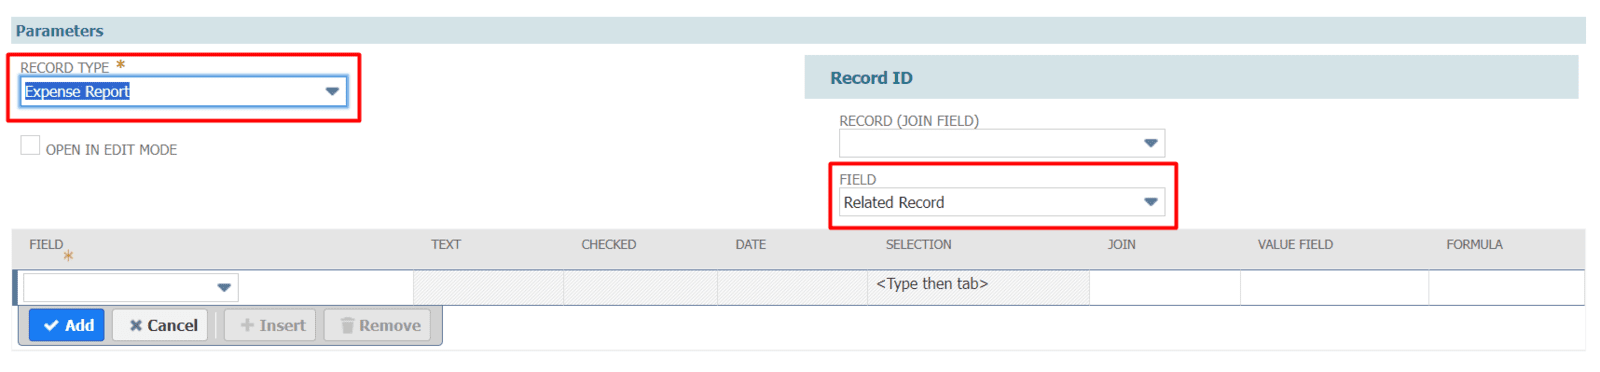
**As a side note here, if you want the user to be directed to an already existing record (like we mentioned in the very beginning of directing a user to the Customer record joined to an Estimate) then you would use the Record ID parameters to do so. To redirect the user to the Customer from an Estimate you would choose Customer as your record type, then Entity in the field. So the workflow would use the Entity field on the Estimate to know what record the user should be redirected to.
However, since we do not want to go to an existing record, but instead create a NEW record we will leave the Record Type as "Rejection Reason" and the Open in Edit Mode = T.
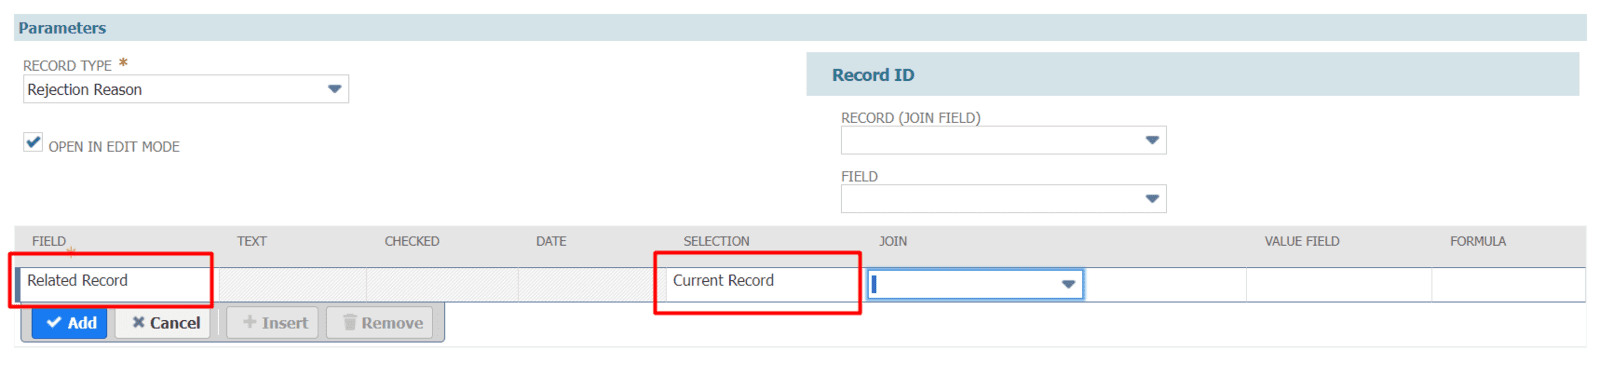
Lastly, using the Field sublist we can pre-define values on the new record being created. For example, if you would like to provide a default value in the Response field on your Rejection Reason record, then you select Response in the Field sublist and then provide a value using either a field on the current record, a formula or a static value
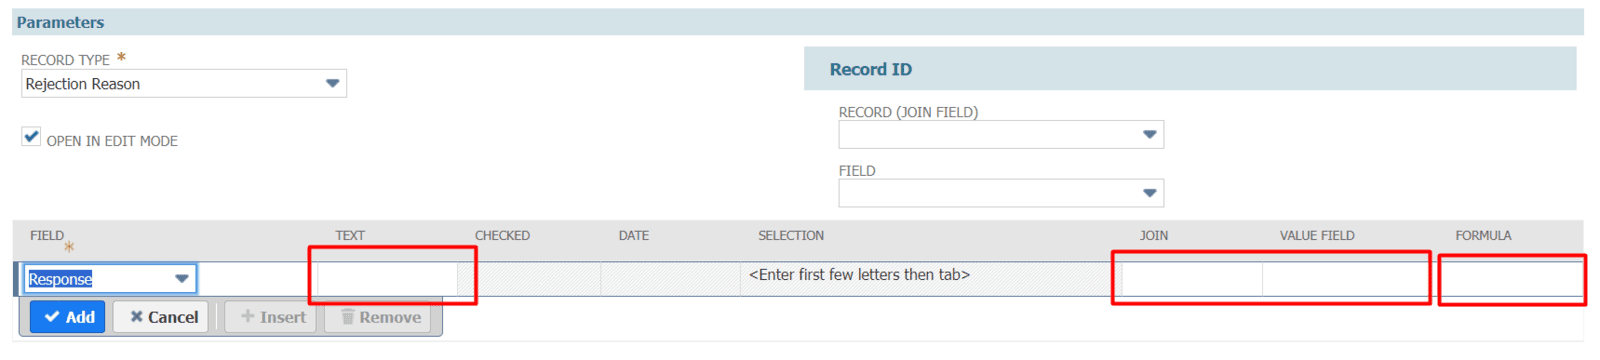
In this case we want to make sure the Rejection Reason record is associated with the current transaction we are rejecting so we will set the Related Record field to be "Current Record"
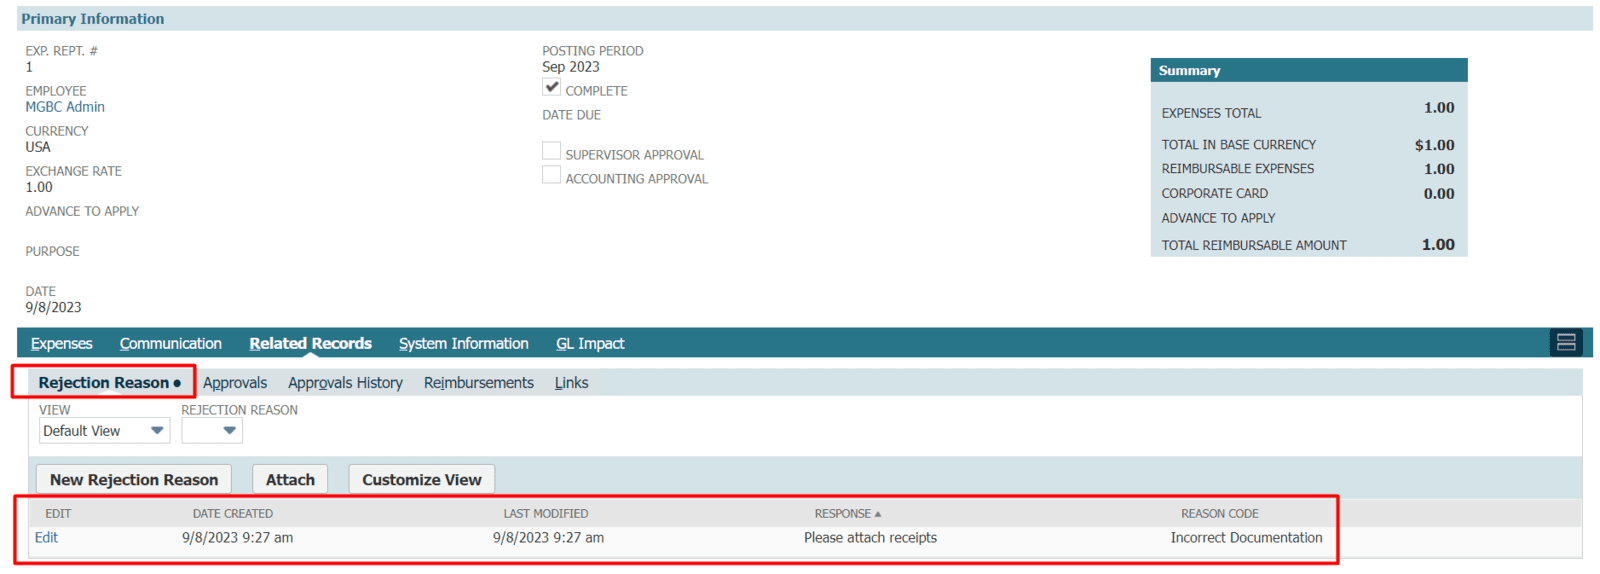
Now the Rejection Reason record the user creates will be automatically associated with the Transaction they were viewing when clicking "Reject". Also note that the Response and Reason Code fields are mandatory so the user cannot navigate away from this Rejection Reason without providing a value.

Also once the response is saved you can see it attached to the Transaction under the subtab you selected with configuring your custom record.
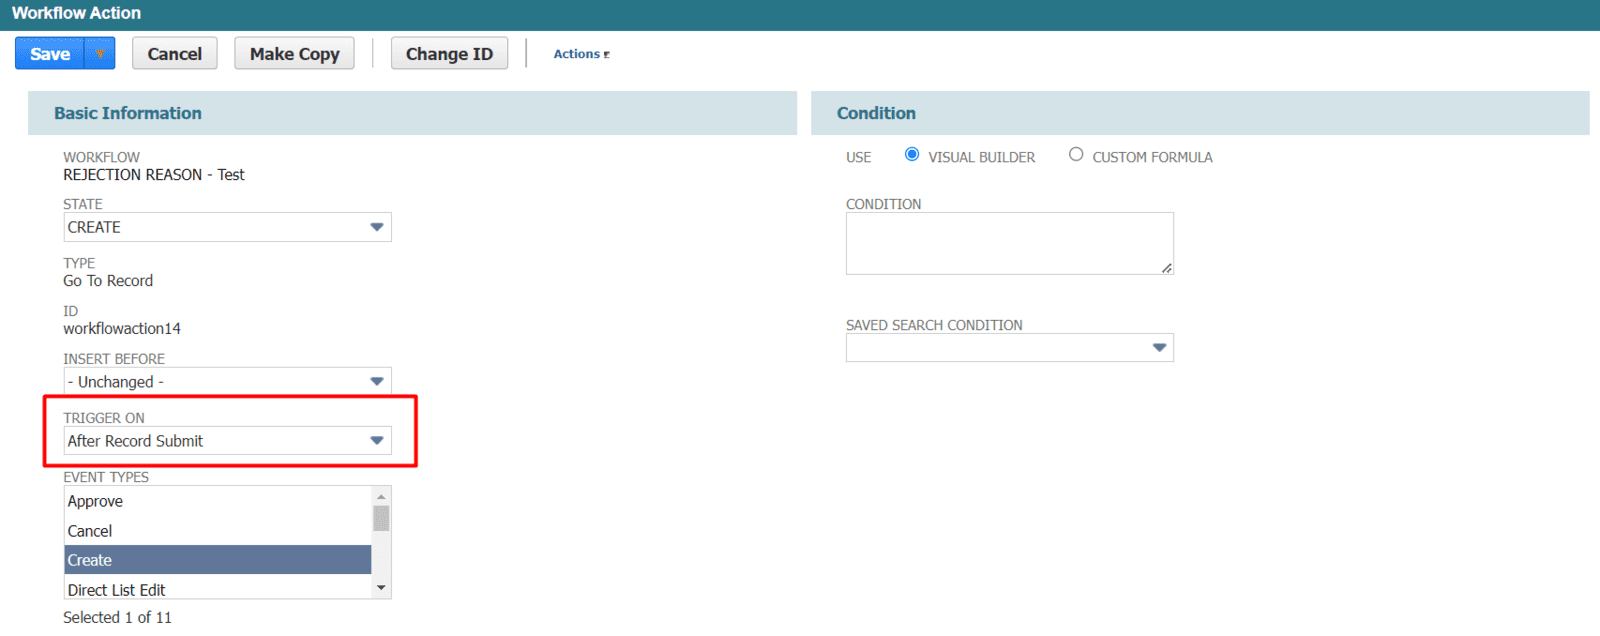
You can also pair this with a workflow you've created on the Rejection Reason record with another Go to Record action so the user is redirected back to the Transaction using an After Record Submit trigger. This way after their response is recorded they are sent back to the original transaction they were working on. Here is the setup for that workflow action.
While you can see that this solution is not ideal as there are a few potential places for the user to circumvent the process by closing a window too soon or a timeout from NetSuite. Also, the user experience is a little clunky while still maintaining the overall objective. But most of the time this solution is widely accepted and does provide a great example of how to capture responses in NetSuite without having to write any scripting. As mentioned above our simple utility for capturing user input can be easily deployed to your account and used within any workflow or any record. Check out this quick video on our Pop-up with User Input action.
If you would like more tips and tricks on how to optimize your NetSuite environment with workflows, automation and customizations then follow our blog or check back often. We are also available to help design, implement and/or troubleshoot any customization at any level. Just reach out to us with questions and insights on how we can help your business grow!