
While interacting with records and transactions in NetSuite it is extremely helpful to users to have data validated and explanations for when data entered may be incorrect. Also simplifying the form to make data entry quicker and easier. We discussed the use of pop-ups in our blog post on the Confirm, Show Message and Return User Error actions, but now we will cover 3 actions that allow you to manipulate individual fields on the record.
The Set Field Display Type, Set Field Display Label and Set Field Mandatory Actions all allow you to control what the user sees and/or what the user is required to input right from your workflow. You can easily guide the user through each record form by showing fields, hiding fields, updating the field labels (names) and even changing what is mandatory or not.
One of the nice things about these actions is that they are able to be executed from almost any client trigger and even a few server triggers. Below is a list of triggers and how they interact with the record being affected by the workflow. If you would like more information about how triggers work while working with records in NetSuite read our blog post on Workflow Triggers, Contexts and Event Types.
| Trigger (TRIGGER TYPE) | Description |
| On Entry (SERVER) | When the record enters the specific State the action is placed within, it will be triggered as long as the condition is met. |
| Before Record Load (SERVER) | As the record is being loaded from the database the action is triggered as long as the condition is met. The action affects the record BEFORE the user is able to interact with or make any changes to the record. The condition of the action can only use data that has already been saved to the database |
| Before User Edit (CLIENT) | The record is fully loaded and is displayed in Edit mode to the user. However, before any fields can be updated or changed the action is triggered as long as the condition is met. |
| Before Field Edit (CLIENT) | The record is fully loaded in the browser and is displayed in Edit mode to the user. The user is allowed to change field values, however, before the user "leaves" or "gets out of" the triggering field the action is triggered. So data is allowed to be entered or changed within the field, but the user cannot save or move to another field until the action is triggered (as long as the condition is met). This action requires you to set a "triggering client field" which denotes the field in which the user must manipulate to trigger the action. |
| After Field Edit (CLIENT) | The record is fully loaded in the browser and is displayed in Edit mode to the user. The user is allowed to change field values and "move to" other fields after changing the "triggering client field". However, the action is triggered as soon as the user "leaves" the triggering client field and the action is performed as long as the condition is met. This action requires you to set a "triggering client field" which denotes the field in which the user must manipulate to trigger the action. |
| After Field Sourcing (CLIENT) | The record is fully loaded in the browser and is displayed in Edit mode to the user. The user is allowed to change field values and "move to" other fields. If any of the fields being changed are used to source the value of another field, you can trigger an action to be performed after that sourcing occurs, as long as the condition is met. This action requires you to set a "triggering client field" which would be the field you change that CAUSES the sourcing to occur, NOT the field that gets sourced with a value. |
| Before User Submit (CLIENT) | The record is fully loaded in the browser and is displayed in Edit mode to the user. The user is allowed to freely change or add field values and click the "Save" button. Upon clicking the "Save" button the action is triggered as long as the condition is met. The action is performed BEFORE any new data or updated data is saved to the database and BEFORE the record attempts to be saved, so stopping the Save function and allowing more changes to be made to the record if required. |
| Before Record Submit (SERVER) | The record is fully loaded in the browser and is displayed in Edit mode. The user is allowed to freely change or add field values and click the "Save" button. Upon clicking the Save button the action is triggered as long as the condition is met. The action is triggered BEFORE new data or updated data is saved to the database, but AFTER the save function is initiated so no more changes can be made to the record at this time. |
| After Record Submit (SERVER) | The record is updated and changed and the Save button is clicked. The record is fully saved to the database with the new data, then loaded again to trigger the action (if the condition is met). The action triggers and is performed then the record is saved to the database again with the new changes caused by the workflow action. |
| On Exit (SERVER) | When a transition is added to a state the record will transition to another state when the condition of the transition is met. As the record Exits the first state the action will be triggered. |
| Scheduled (SERVER) | NetSuite has a scheduler that runs every 30 minutes checking for scheduled actions and transitions. If the condition of the action is met it will be triggered. If it is not met it will be ignored and checked again the next time the scheduler runs. |
Now that we've gone through each trigger in detail we will go over which triggers are appliable to these three workflow actions
NOTE - These actions are not available for Scheduled triggers.
| Action | On Entry | Before Record Load | Before User Edit | Before Field Edit | After Field Edit | After Field Sourcing | Before User Submit | Before Record Submit | After Record Submit | On Exit |
| Set Field Display Type | X | X | X | X | X | X | ||||
| Set Field Display Label | X | X | X | X | X | X | ||||
| Set Field Mandatory | X | X | X | X | X | X |
Now let's discuss what each action actually does.
- Set Field Display Type - this will change the way the field is displayed to the user while interacting with the record. There are 4 options for this action:
- Normal - the field will be displayed normally in both View and Edit mode and there are no restrictions on Editing it
- Disabled - the field will be displayed normally in View mode, but in Edit mode the field will be "grayed" out and will not be able to be edited. (NOTE - Disabled fields can still be updated by workflow actions)
- Inline - the field will be display as Inline HTML text in both View and Edit mode. The user will not be able to edit or change the field value when the display type is Inline
- Hidden - the field will be hidden from the user in both View and Edit mode.
- Set Field Display Label - this will change the field name or label that is shown to the user in both View and Edit mode (depending on the trigger used).
- Set Field Mandatory - the field will be mandatory and cannot be left empty. You can also toggle a field to be NOT mandatory as well.
The parameters of these actions are all very similar and managed pretty much the same. The first step is to define the trigger to be used, or WHEN the action should be performed. Then define any specific contexts or events that should trigger this action. Lastly, define a condition that tells the workflow what criteria should be used to trigger the action.
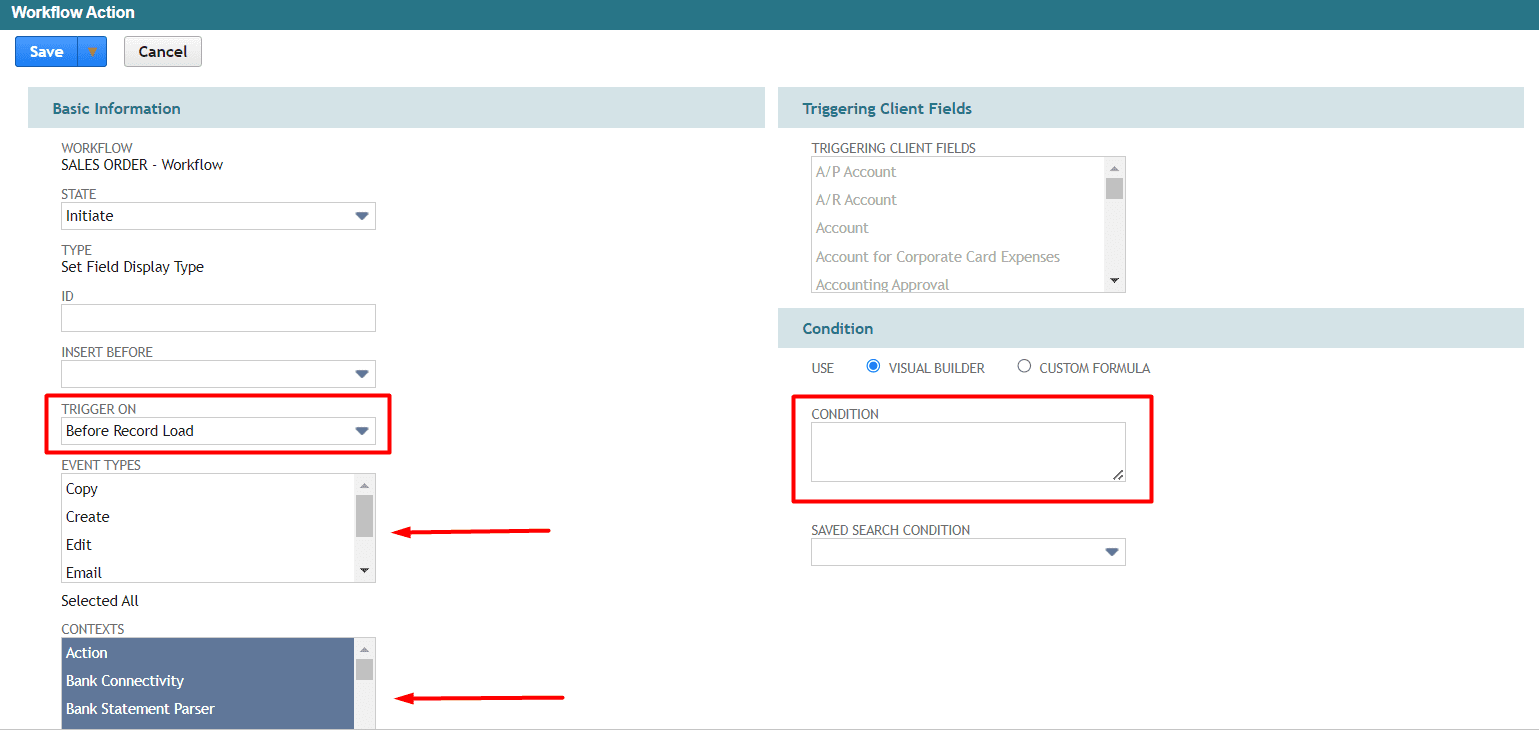
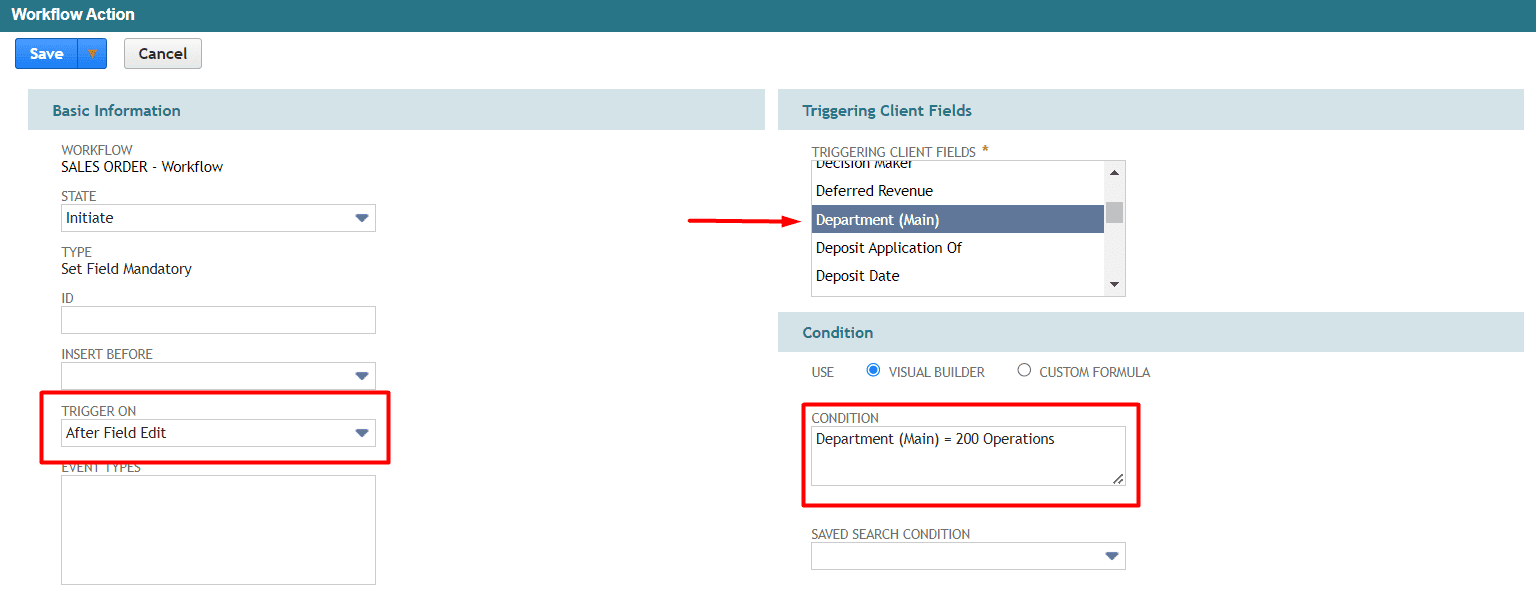
In this example we want to make the the Class field mandatory when the Department is set to "200 Operations". In this case we will use the After Field Edit trigger with the correct condition. This way when someone edits the Department field the workflow will evaluate if the Department is "200 Operations" and if it is, trigger the action to make the Class field mandatory.
(Be sure to set the Triggering Client Field to Department as we want this action only to be triggered when someone updates the Department field)
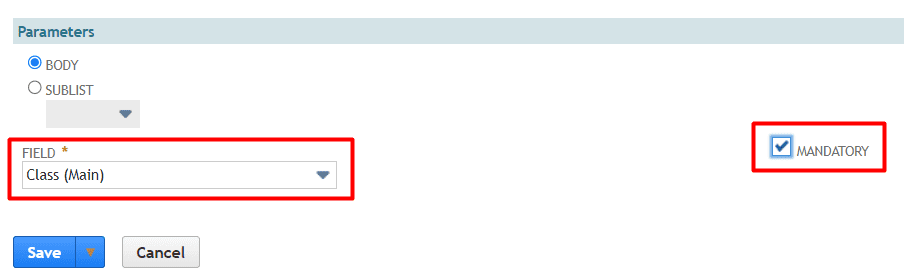
Next we need to define the parameters of the action. Here we will tell the workflow WHAT field needs to have the mandatory flag toggled and whether to turn ON the mandatory setting or turn OFF the mandatory setting.
(Leaving Mandatory checkbox unchecked will make the field NOT mandatory. Leaving the Mandatory checkbox checked will make the field mandatory.)
As an added bonus you can toggle between Sublist and Body fields within these actions to change the field Display Type, Label and Mandatory setting for fields within the Items sublist on transactions, just like you can affect body fields.
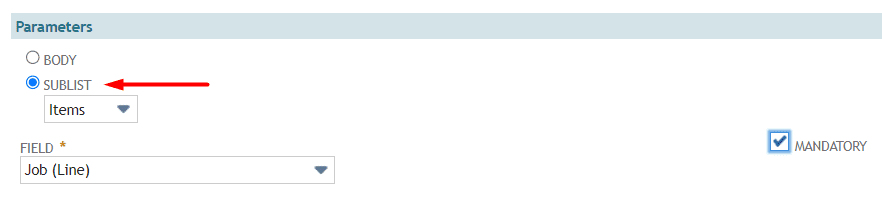
With this setup we can make the Job (or Project) field on each line when the Department of "200 Operations is selected
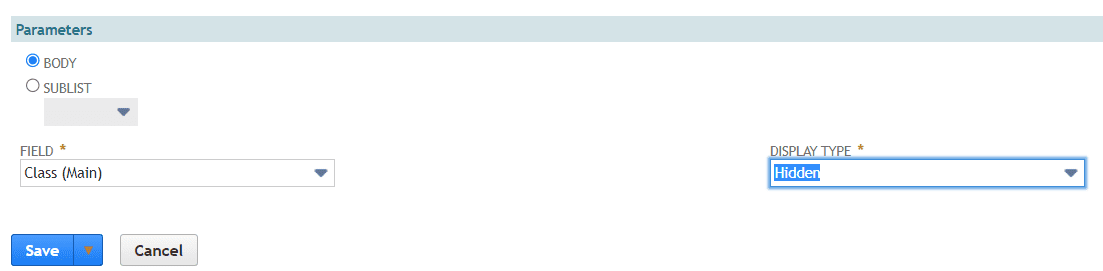
The Set Field Display Type has a few different parameters (described above) but functions similarly to the Set Field Mandatory Action. Using the same After Field Edit trigger and Triggering Client Field of Department, but changing the condition to Department is NOT "200 Operations", the Class field will now be Hidden when the Department is changed and does not equal "200 Operations"
Lastly, we will change the Display Label of the Class field to "Financial Segment" when the Department is set to "900 Finance". This way when someone selects the Finance department on a Transaction the Class field will be displayed as "Financial Segment" for more clarity to the financial user, but without having to add new custom fields to the record.

All these actions may seem small or "ticky-tacky" improvements to your system, but they can make a BIG difference when it comes to data consistency and accuracy. Ensuring that users are always entering the correct information into the correct fields and NOT missing anything when required is a huge benefit to your NetSuite eco-system. As the saying goes, "Garbage in, garbage out." This will stop the garbage from even entering you system to keep it clean and maintained on an ongoing basis.