
As the next installment of our Workflows for beginners series we will tackle 3 similar actions all at once. NetSuite provides you 3 different actions to provide useful feedback to your users as they are interacting with records in NetSuite. Each action functions very similar to the other but they all have some functions and abilities that others do not. The 3 actions are:
- Confirm
- Show Message
- Return User Error

One of the most common limitations that people need to overcome with workflows is regarding pop-up messaging. The Confirm, Show Message and Return User Error actions all provide feedback to the user through a pop up dialog box, however, in many cases this pop-up really needs to get information from the user. This is a big limitation in workflows (especially since MOST workflows are created for some sort of Approval process). Usually, a people want a pop-up window that allows the user to enter data or information that can be stored and recalled at a later time. This is where our Pop-Up with User Input custom action comes in. We have developed a simple action that you can deploy to your account that allows you to add a pop-Up message to any workflow and the pop-up window requires the user to input data. The inputted data then gets stored in the field of your choice to be used in other actions, criteria or even reporting. Learn more about our Pop-Up with User Input action here.
As mentioned above the 3 actions have many similarities and a few differences. As far as the triggers supported the table below shows the differences and similarities between them.
| Action | On Entry On Exit | Before Record Load | Before User Edit | Before Field Edit | After Field Edit | After Field Sourcing | Before User Submit | Before Record Submit |
| Confirm | X | X | ||||||
| Show Message | X | X | X | X | X | |||
| Return User Error | X | X | X | X | X | X | X | X |
Also the buttons available to the pop-up window differs between the 3 different actions.
| Action | Pop-up Contains "OK" Button | Pop-up Contains "Cancel" Button | Pop-up Contains "Go Back" Button |
| Confirm | X | X | |
| Show Message | X | ||
| Return User Error | X | X (Only with Server Triggers) |
So again, while all three actions are very similar you can use them all in different scenarios to produce different results. Also the buttons clicked in the pop-up window perform different actions on the record. Let's walk through each action and each trigger in detail now to get a little more context around which action to use when.
Confirm Action
- Before Field Edit
- The record is loaded in Edit mode, then the user edits a field value. The pop-up will appear after the user tries to exit the field they are changing and ask them to Confirm their entry (you must select the Triggering Client field in the workflow action parameters so the system knows what field should trigger the pop-up to appear). If the user clicks "Ok" the new value is maintained in the field. If the user clicks "Cancel" the new value is reverted back to is original value
- Before User Submit
- The record is loaded in Edit mode, then the user is allow to freely update or change any fields on it. When the user clicks the Save button a pop-up appears asking the user to Confirm their submission. If the user clicks "Ok" the record is submitted and saved. If the user clicks "Cancel" the record does nothing and just remains in Edit mode for the user to continue editing.
Show Message
- Before User Edit
- The record is fully loaded in Edit mode but before the user can make any changes to the record a pop-up message will appear, if the condition of the action is met. The user can simply click the "Ok" button and continue to edit the form
- Before Field Edit
- The record is loaded in Edit mode, then the user edits a field value. The pop-up will appear after the user tries to exit the field they are changing (you must select the Triggering Client field in the workflow action parameters so the system knows what field should trigger the pop-up to appear). The user can click the "Ok" button to close the pop-up window and continue editing the record.
Technically, the new value entered into the field is NOT retained until the user clicks the "Ok" button, but with the Show Message action no change is made to the field value after closing the pop-up. - After Field Edit
- The record is loaded in Edit mode, then the user edits a field value. The pop-up will appear after the user tries to exit the field they are changing (you must select the Triggering Client field in the workflow action parameters so the system knows what field should trigger the pop-up to appear). The user can click the "Ok" button to close the pop-up window and continue editing the record.
- After Field Sourcing
- The record is loaded in Edit mode and the user is allowed to freely edit the form. If any field is being populated through a sourced value; (ie. when you select the Customer on a Sales Order the Sales Rep field is automatically sourced on the Sales Order, based on the Sales Rep set on the Customer record), a pop-up appears when that sourcing is complete (you must select the Triggering Client field in the workflow action parameters so the system knows what field should trigger the pop-up to appear).
- Before User Submit
- The record is loaded in Edit mode, then the user is allow to freely update or change any fields on it. When the user clicks the Save button a pop-up appears with a notification message. The user clicks "Ok" the record is submitted and saved. The system is not stopped or reverted after clicking the "Ok" button as this pop-up is only informational.
Return User Error
Server Triggers
The Return User Error action is the only pop-up that can be deployed using server triggers. This means that you can show a message to the user before the record is fully loaded or fully saved to the database (ie. before the user is allowed to interact with the record or before any changes are fully committed/saved). The Entry or Exit triggers act as server triggers as records can only transition between states within the server, not as the user is actively interacting with the record. So for example if a record enters a new state while it is being loaded then it acts as a Before Record Load trigger. Or if a record Exits a state Before Record Submit then the Exit trigger acts as a Before Record Submit trigger
- Before Record Load (Entry or Exit)
- As the record is being loaded in View or Edit mode the criteria of the action is being evaluated. If the criteria is met a new browser page is displayed with the message you define in the parameters of the action. The user can click the Go Back button and they are returned to the previous page. The user is unable to see or interact with the record.
- Before Record Submit (Entry or Exit)
- The record is loaded in Edit mode and the user is allowed to freely edit and manipulate the record. When the user clicks the save button the record is triggered to be submitted to the database for "storage". However, if the criteria of the Return User Error Action is met a new browser page is displayed with the message you define in the parameters of the action. The user can click the Go Back button and they are returned to the previous page (ie the record they were just editing). However, all information the user entered/updated is lost and must be re-entered.
Client Triggers
- Before User Edit
- The record is fully loaded in Edit mode but before the user can make any changes to the record a pop-up message will appear, if the condition of the action is met. The user can simply click the "Ok" button and continue to edit the form.
- Before Field Edit
- The record is loaded in Edit mode, then the user edits a field value. The pop-up will appear after the user tries to exit the field they are changing (you must select the Triggering Client field in the workflow action parameters so the system knows what field should trigger the pop-up to appear). The user can click the "Ok" button to close the pop-up window, however, they are not allowed to "leave the field" until the condition of the action is met. So if the user is changing the Department field on a record to Department 9 - Accounting, and the condition of your Return User Error action is set to Department = 9 - Accounting, then the user will not be allowed to edit any other field until they have changed the Department to any other value.
- After Field Edit
- The record is loaded in Edit mode, then the user edits a field value. The pop-up will appear after the user tries to exit the field they are changing (you must select the Triggering Client field in the workflow action parameters so the system knows what field should trigger the pop-up to appear). The user can click the "Ok" button to close the pop-up window and continue editing the record.
- After Field Sourcing
- The record is loaded in Edit mode and the user is allowed to freely edit the form. If any field is being populated through a sourced value; (ie. when you select the Customer on a Sales Order the Sales Rep field is automatically sourced on the Sales Order, based on the Sales Rep set on the Customer record), a pop-up appears when that sourcing is complete (you must select the Triggering Client field in the workflow action parameters so the system knows what field should trigger the pop-up to appear).
- Before User Submit
- The record is loaded in Edit mode, then the user is allow to freely update or change any fields on it. When the user clicks the Save button a pop-up appears with a notification message, if the condition of the action is met. The user clicks "Ok" the record remains in edit mode until the error is fixed. (ie. the condition is no longer met). For example, if the user has changed the Department field on a record to Department 9 - Accounting, and the condition of your Return User Error action is set to Department = 9 - Accounting, then the user will not be allowed to save the record until they have changed the Department to any other value.
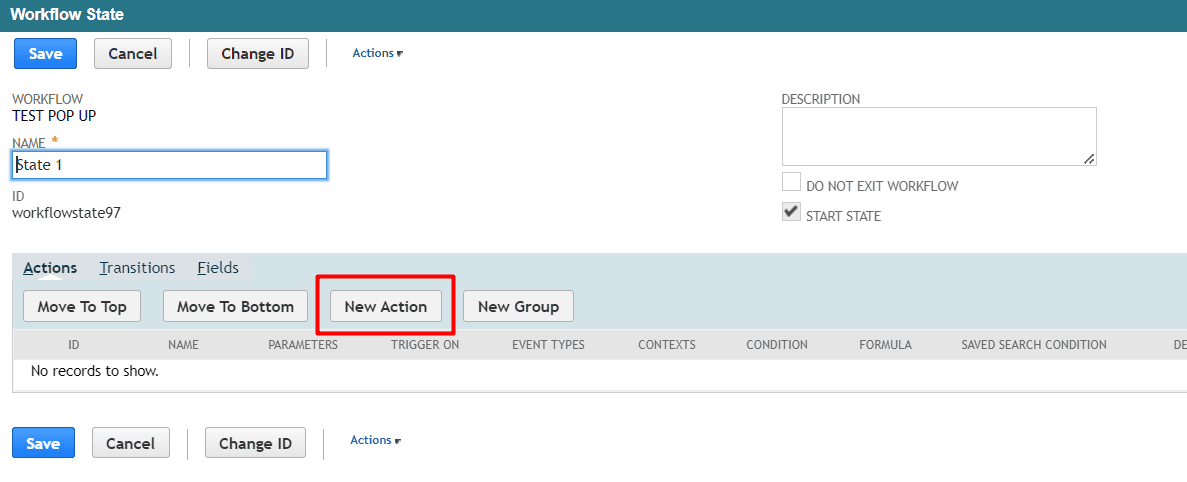
To setup one of these actions the steps are almost all the same. Within your workflow state click on the New Action button
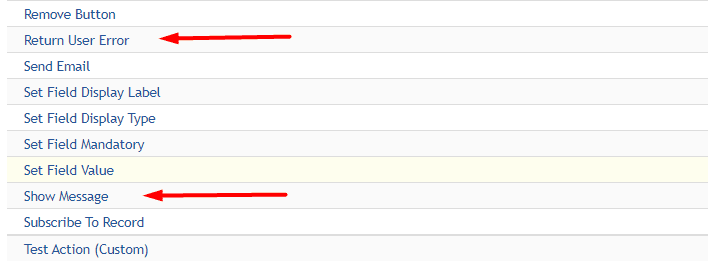
Then select the correct Action from the list that matches your use case.
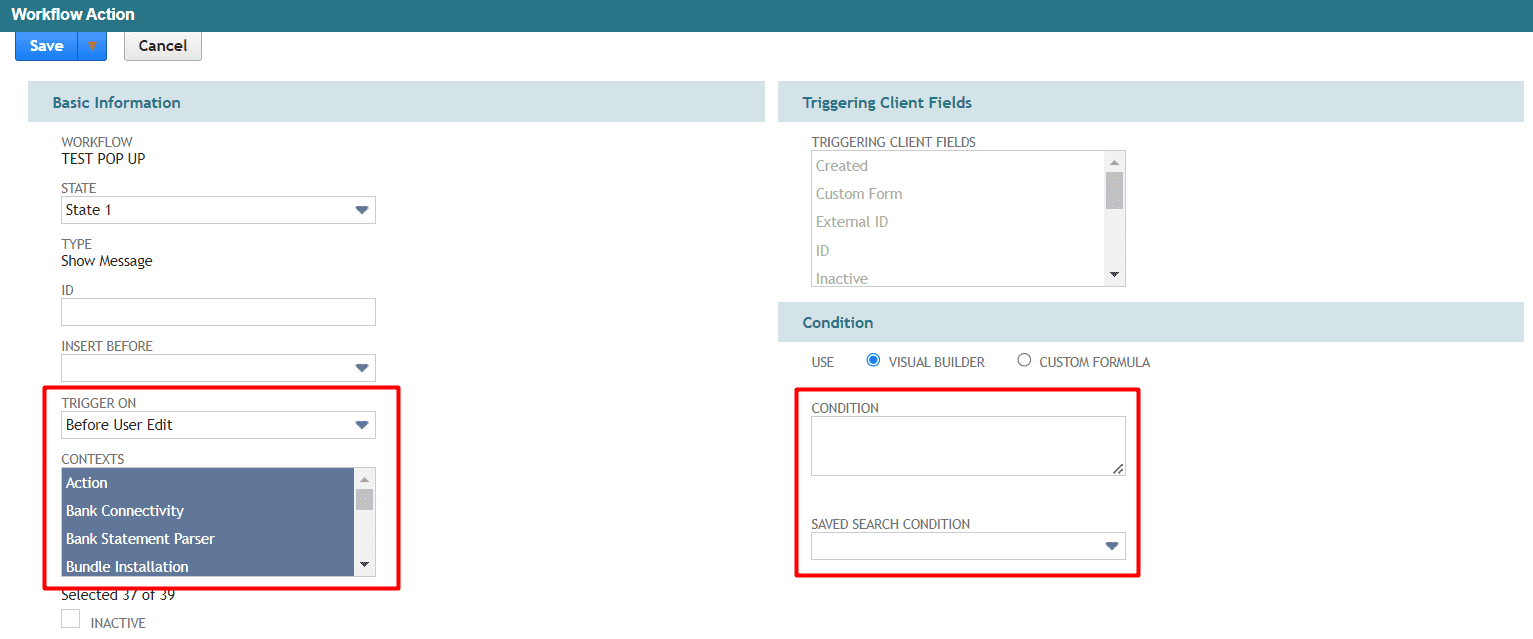
In the parameters section define the trigger, context and condition of the action.
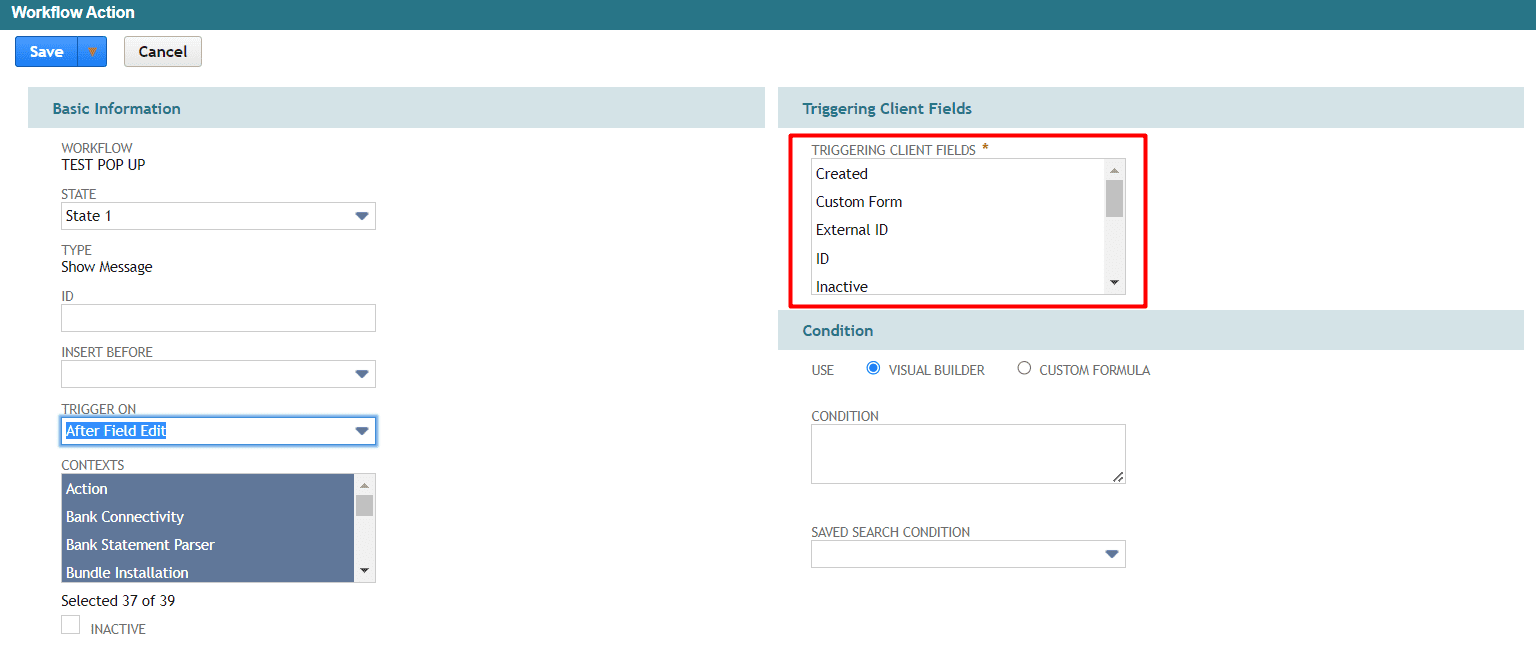
If you are using the Before Field Edit, After Field Edit or After Field Sourcing trigger then you should also define the Triggering Client Field. This tells NetSuite which field to be "monitoring" for changes to know when to trigger the pop-up.
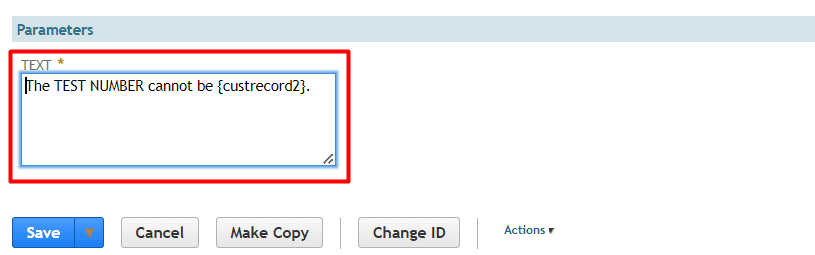
Lastly, you need to define what text should be displayed in the pop-up message, by using the Text parameter.
(NOTE: You can also source field values dynamically into the text by putting the field ID in curly brackets and NetSuite will source the value in the referenced field into the text of the pop-up message.)
As you can see these 3 actions provide a lot of great functionality to help your users correctly enter information and also be aware of why certain actions or data entered is not allowed. Also, there is a lot of flexibility available between these 3 actions to make sure the user experience is optimized and does not drive inefficiency or frustration within your users.
Let us know how you use these actions and keep checking back for more updates on how to use all the native functionality NetSuite offers within workflows.