
Anyone who has built, managed or updated a workflow in NetSuite has most likely used the Set Field Value action. In fact, the Set Field Value action is hands-down the most used workflow action throughout workflows. Most likely, this is because the use cases and business scenarios for the Set Field Value action are easier to envision and deploy. Furthermore, it is probably due to the widely applicable utility of being able to set field values based on almost any criteria or condition you can think of AND also sourcing the value that gets set from other fields or records within the system or even have it calculated from a formula. The possibilities are endless when it comes to the ways you can leverage this action to help your team quickly and easily create and update records, while simultaneously maintaining data integrity and consistency throughout the system.
One of the key elements to remember about the Set Field Value action is the trigger that you use to perform the action. It is widely versatile and supports every trigger available to workflows. Use the table below to understand how each trigger effects the functionality of this action and how you can leverage different triggers to perform the action in the way that you want.
| Trigger (TRIGGER TYPE) | Description |
| Entry (SERVER) | When the record enters the specific State the action is placed within, it will be triggered as long as the condition is met. The field value will be set based on the parameters one time, but not again as it only happens when the record enters the state and not again after. |
| Before Record Load (SERVER) | As the record is being loaded from the database the action is triggered as long as the condition is met. The field value is set BEFORE the user is able to interact with or make any changes to the record. The condition of the action can only use data that has already been saved to the database |
| Before User Edit (CLIENT) | The record is fully loaded and is displayed in Edit mode to the user. However, before any fields can be updated or changed the action is triggered and the field value is set as long as the condition is met. |
| Before Field Edit (CLIENT) | The record is fully loaded in the browser and is displayed in Edit mode to the user. The user is allowed to change a fields value, however, before the user "leaves" or "gets out of" the triggering field the action is triggered. So data is allowed to be entered or changed within the field, but the user cannot save or move to another field until the action is triggered (as long as the condition is met). This action requires you to set a "triggering client field" which denotes the field in which the user must manipulate to trigger the set field value action. |
| After Field Edit (CLIENT) | The record is fully loaded in the browser and is displayed in Edit mode to the user. The user is allowed to change field values and "move to" other fields after changing the "triggering client field". However, the action is triggered as soon as the user "leaves" the triggering client field and the field value is set as long as the condition is met. This action requires you to set a "triggering client field" which denotes the field in which the user must manipulate to trigger the action. |
| After Field Sourcing (CLIENT) | The record is fully loaded in the browser and is displayed in Edit mode to the user. The user is allowed to change field values and "move to" other fields. If any of the fields being changed are used to source the value of another field, you can trigger the set field value action to be performed after that sourcing occurs, as long as the condition is met. This action requires you to set a "triggering client field" which would be the field you change that CAUSES the sourcing to occur, NOT the field that gets sourced with a value. |
| Before User Submit (CLIENT) | The record is fully loaded in the browser and is displayed in Edit mode to the user. The user is allowed to freely change or add field values and click the "Save" button. Upon clicking the "Save" button the action is triggered as long as the condition is met. The set field value is performed BEFORE any new data or updated data is saved to the database and BEFORE the record attempts to be saved, |
| Before Record Submit (SERVER) | The record is fully loaded in the browser and is displayed in Edit mode. The user is allowed to freely change or add field values and click the "Save" button. Upon clicking the Save button the action is triggered as long as the condition is met. The set field value action is triggered BEFORE new data or updated data is saved to the database, but AFTER the save function is initiated so no more changes can be made to the record at this time. |
| After Record Submit (SERVER) | The record is updated and changed and the Save button is clicked. The record is fully saved to the database with the new data, then loaded again to trigger the set field value action (if the condition is met). The field value is set and then the record is saved to the database again with the new changes caused by the workflow action. |
| Exit (SERVER) | When a transition is added to a state the record will transition to another state when the condition of the transition is met. As the record Exits the first state the set field value action will be triggered. |
| Scheduled (SERVER) | NetSuite has a scheduler that runs every 30 minutes checking for scheduled actions and transitions. If the condition of the action is met the field value will be set according to the parameters of the action. If it is not met it will be ignored and checked again the next time the scheduler runs. |

As you will see below the set field value action can be used to set the value of the field you choose by either providing a "static" value, getting the value from another field on the current record, getting the value from another field on a joined record OR using a formula to provide the field value. You can also use a saved search to "calculate" or source the value of this action by creating a non-stored, hidden field on the record that has it's value sourced from a saved search. I detail how exactly to setup this function in another blog post that you can read here. Make sure that you use the correct trigger with each of these options so effectively set the correct field value.
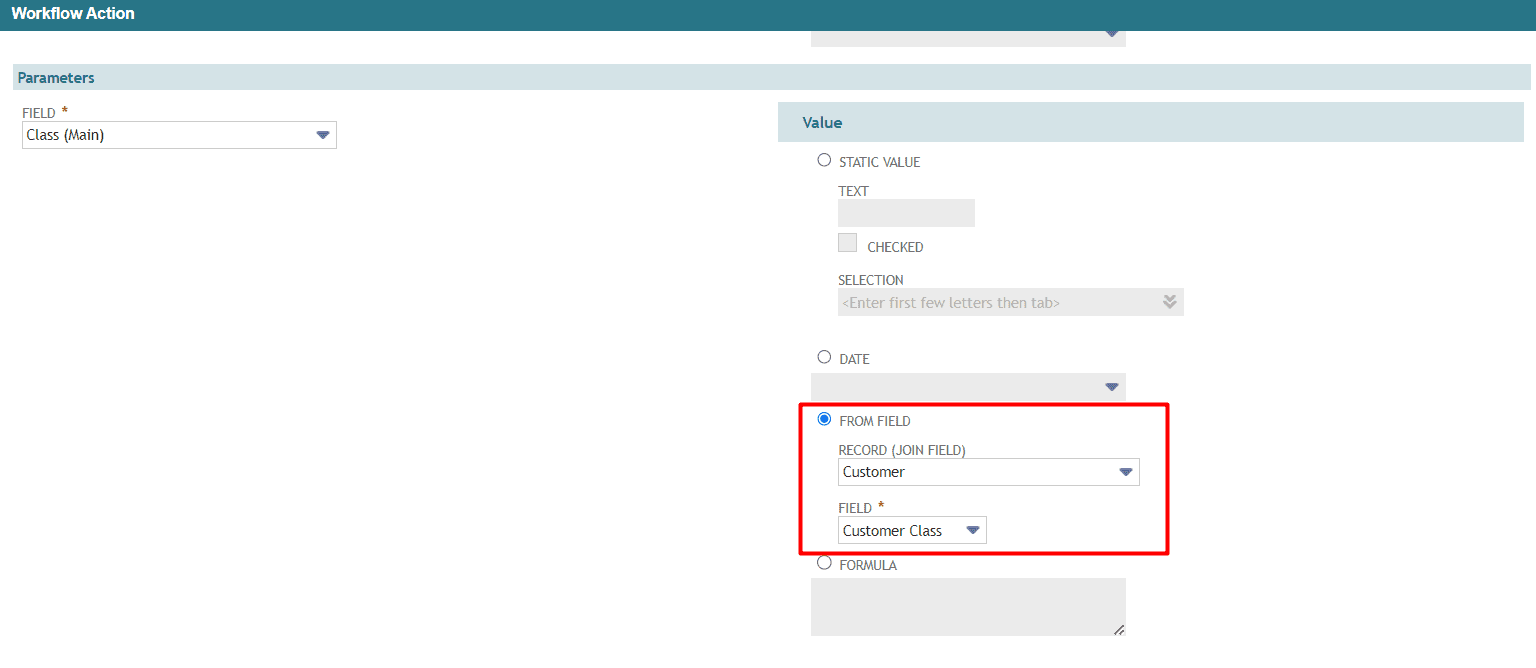
In this example the requirement is that we have a custom field on the Customer record that stores the Class segment assigned to each Customer. Using a workflow we want to set the Class field on all Sales Orders created to match the Class from the Customer record.
To setup this action properly, start by adding the Set Field Value action into your workflow state.

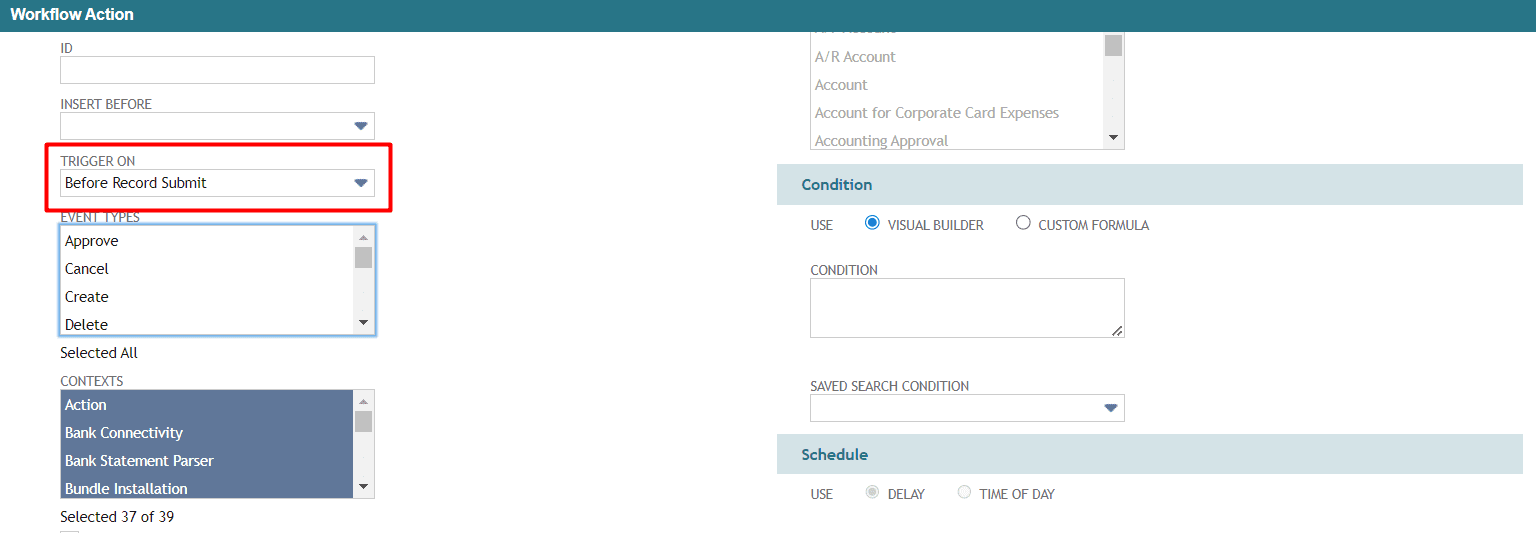
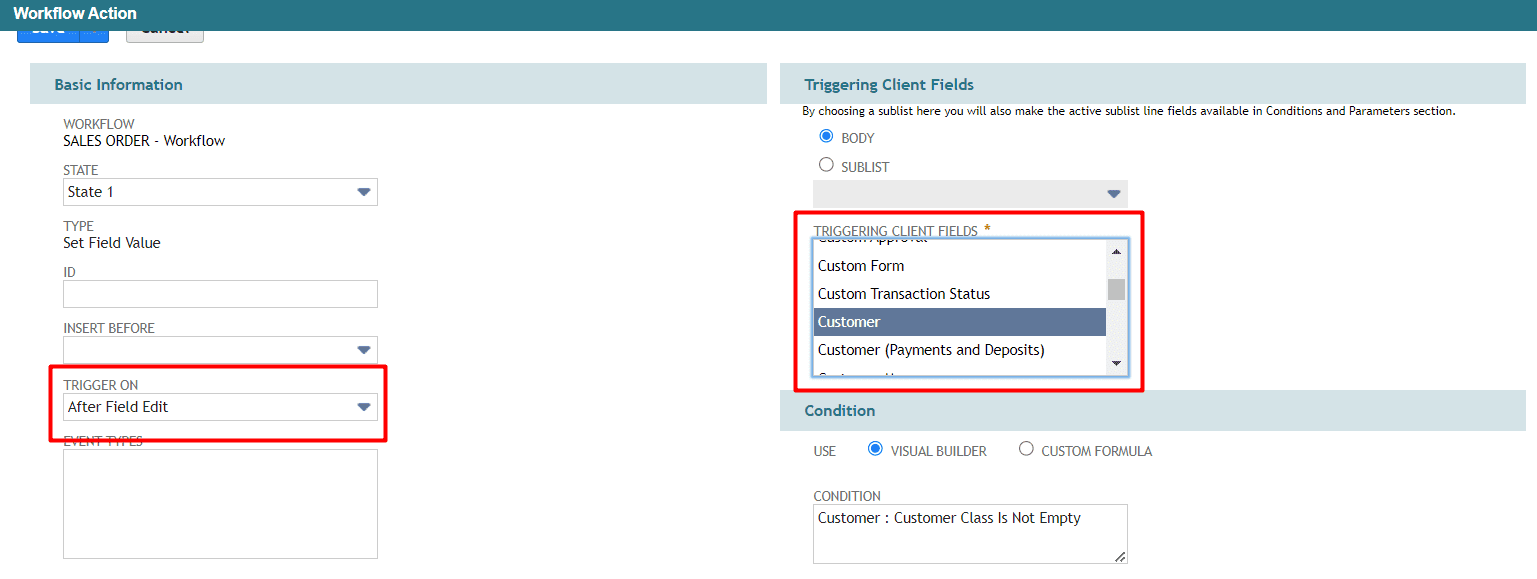
Next choose the correct Trigger you would like to use for this action. In this example we will use the Before Record Submit. This is usually considered the lowest impact to overall system performance as it does not require additional loads of the record AND it fires quickly as the record is being saved. Also this way you know the field value will be set successfully each time as the user cannot disrupt any actions being triggered after they submit the record

One example of how a trigger can make a big difference on the data available to the set field value action is the document number or {tranid} of a transaction. If you have Auto-Numbering enabled for Sales Orders, the document number or {tranid} is not assigned to the record until it is saved to the database because the auto-numbering script does a lot of validations to ensure there is no duplicate numbering within the system. Because of this, you cannot use the document number field to set the value of another field UNLESS you use the After Record Submit trigger. If using Before Submit, the database does not "know about" the new document number yet. So you need to let it be saved to the database, load the record again and use the newly created document number to set the value of another field. This is exactly what the After Record Submit trigger does.
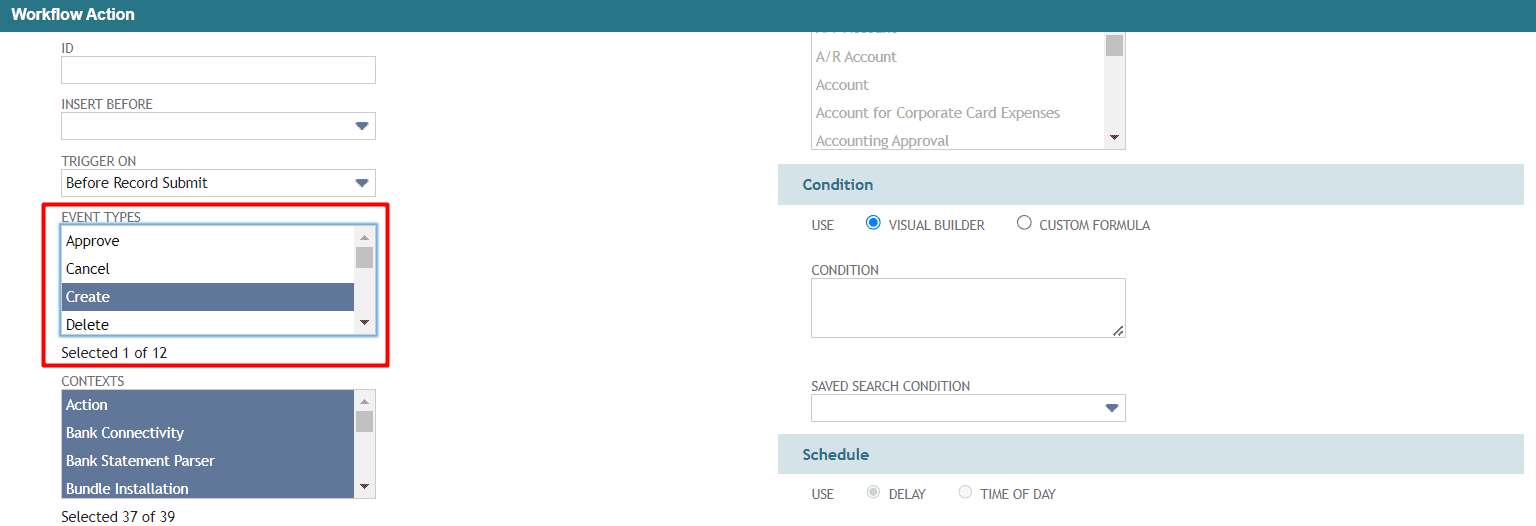
Now we can choose the correct Event Type and Context to meet your business use case. You can read more about Event Types and Contexts in our article dedicated to this topic. Because we do not need the Class field set every time someone views or edits a Sales Order we can use the "Create" Event Type to limit the impact to system performance and only set the value when the record is first created
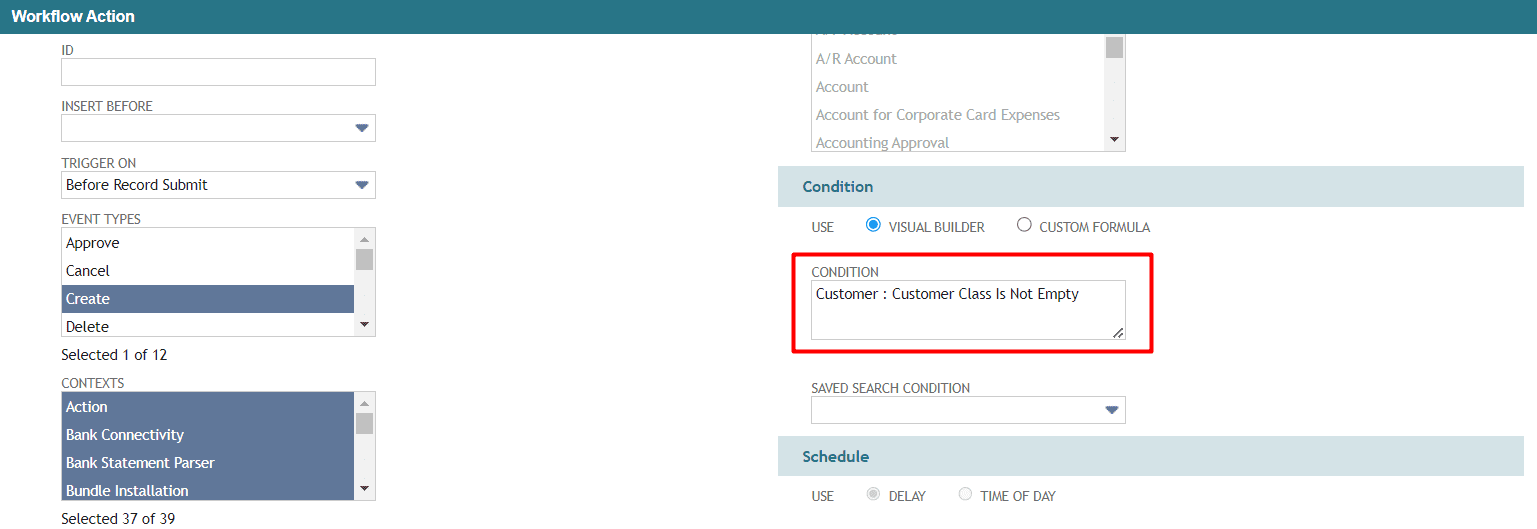
We will also add a condition to this action so that it only fires if the Customer Class is NOT EMPTY. There is no reason to try and set a field value if the sourcing field also does not have a value.
Alternatively, if you are more comfortable with building saved searches you can use a saved search condition as the criteria for your action. This can be especially helpful if you have a very complex condition or multiple conditions that effect this action. Also you can use a summary search as the condition as well which can be even more powerful to summarize data about a record and use that criteria as the basis of your condition. Because the criteria here is very simple we will just stick to the regular condition builder.

Next we will use the parameters section to pick the field we want to set the value of. Remember this is the field we want to change the value of NOT the field we are using as the source of the value we want.
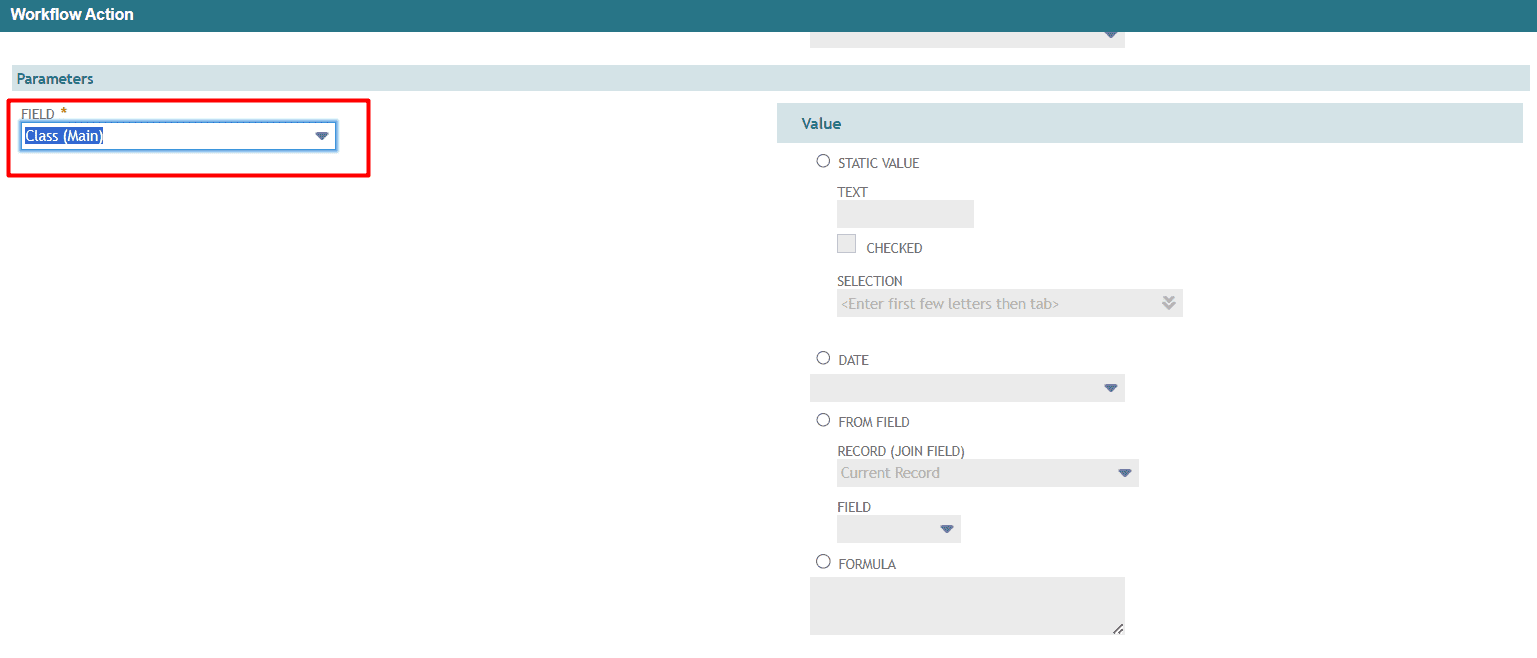
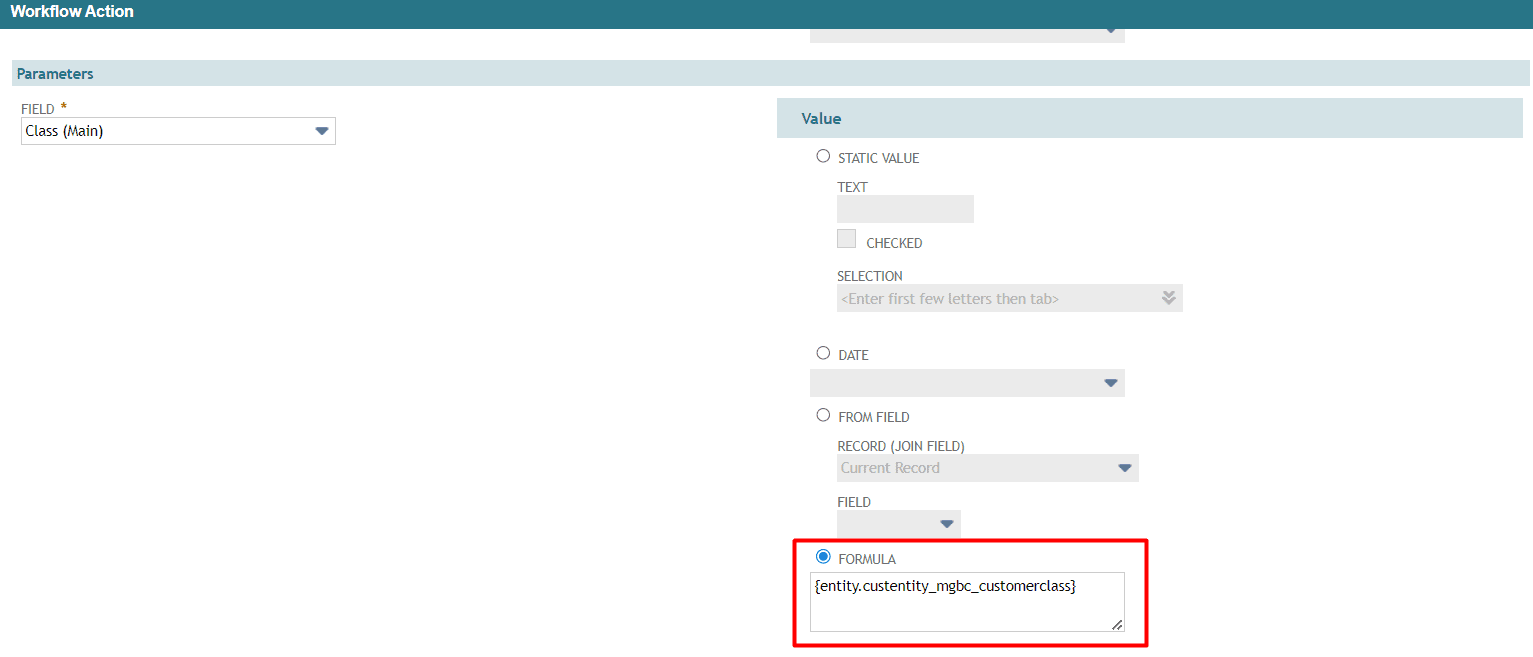
Now we can use the rest of our parameter fields to make sure we set the correct value. We can leverage anyone of the vast array of options here.
- Static Value - set the field to the same value every time. There are different options for different field types (ie. checkbox, date, text, number, etc)
- From Field - get the value from another field on the current record OR a joined record
- Formula - use a formula to set the value.
As you can see just this one small action has MANY different configurations, use cases and options to help you maximize the way your team uses NetSuite. Fortunately, this post is 1 of 3 blog posts on the Set Field Value action. Because its use and setup is so expansive compared to other actions we are going to expand this into 3 Blog posts. Check our Part 2 on this versatile action that covers using the Set Field Value action in the Items sublist.